
|
|
|||||||
| Projects Tell us about your cars mods, past, present and future! |
 |
|
|
Thread Tools |
|
#1
 26-06-2010, 06:32 PM
|
|||
|
|||
|
PROJECT 2
Here we go again. Note: As many of you will know my former thread Project P1 600+ involved Roger Clark Motorsport only. I just wish to say that I was, & still am over the moon with all that RCM achieved with the P1, and I have mentioned this as some may wonder why Project 2 isnt being addressed by them. The P1 project was not subject to any form of budget, whereby P2 will be, and that is the only reason RCM are not building P2. Both Olly & Matt are fully aware of everything and have kindly offered full support & advice at no cost throughout P2 and we intend to involve them. Another current project on SN in the Project section is one entitled DIY 550bhp 2.5 STi V3 Tyrpe R by Daz Davies. I have read his thread from day one and been impressed by his knowledge, commitment, the friendly Northern fukc off attitude and his balls for taking the whole lot on by himself. I was also impressed when we both spent the day at Snetterton setting up & putting the P1 through its first proper (driving it like I just nicked it ) session. Daz will build the engine he has in mind from scratch, at home. We have both spent a fair bit of time discussing the engine and I will let Daz post the intended details. The aim will be 600 650 Bhp. We are aiming at building the whole car within a set budget of 25 30K. My former project thread on the RCM built P1 knocked up over 120,000 hits over 123 pages which suggests many found it interesting seeing a streetcar build develop using a top end tuner. This one will be different. I have my sensible head on for this one regarding dollar, and hopefully it will prove an interesting project to many with a similar budget. Examples of cost cutting would be K-Sport opposed to AP Racing & Syvecs opposed to the Motec800 and such like. When finished I aim to use the car in events such as hill climbs, Scooby related events, track use etc. A future consideration would be to develop the car further and enter Time Attack in whatever class is suitable, however I want to learn the car & its limits over the first year or two, so TA wont be happening in the immediate future. The dyno revealed 562 Bhp on the P1 and driving the thing as my road car is totally insane, so I reackon P2 will be a riot. We already have the shell and will be collecting it next week from Arge Speed. Its there former rally car and it just what we wanted. Its just been painted and includes the following:- Shell: STi 4 1998 RHD lightweight 2 door Type R shell with V5, MSA Rally log book and MOT * Custom Cage fully welded Int. group N T45 cage * strengthened strut tops * strengthened flitch plates * double skinned cills * Alloy firewall * seat rails * doors with electric mirrors/glass with safety film * Alloy bonnet facelift with STi8 scoop bonnet pins and lamp pod fasteners * boot with V6 STi spoiler, * polycarbonate quick release side windows, * laminated front screen * rear tinted screen * WRC roof vent * modified wings to take 18" wheels * sump guard mounting points * front/rear bumpers * facelift grill * lights * modified heater * crossmembers * dash * modified steering column * STi wiring loom with DCCD * dash clocks/DCCD * tank(no pump) * wipers For another grand we also had the following:- Walbro uprated fuelpump/ Spec C intank pick up, All braided aeroequip fuel lines Fuel pressure regulator(fuel labs) with pressure gauge FEV GTEC FIA approved electric plumbed in fire extinguisher system Red top battery/battery box/electric cut off switch and all wiring Bias Pedalbox/hydraulic handbrake and all braided hoses This is the shell that we collecting next week. Adge Speed have kindly fitted some old suspension back on and we are taking a set of wheels to enable a rolling shell. 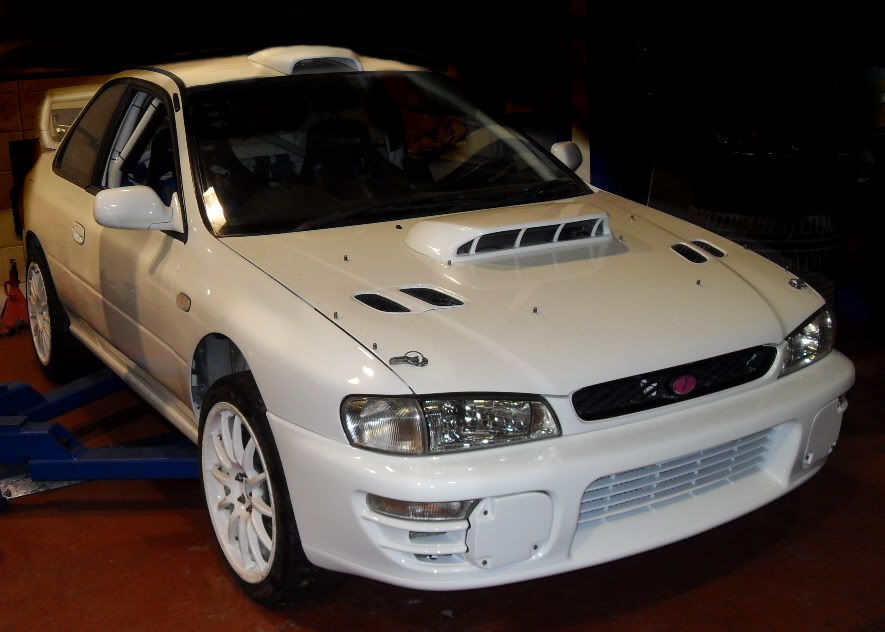 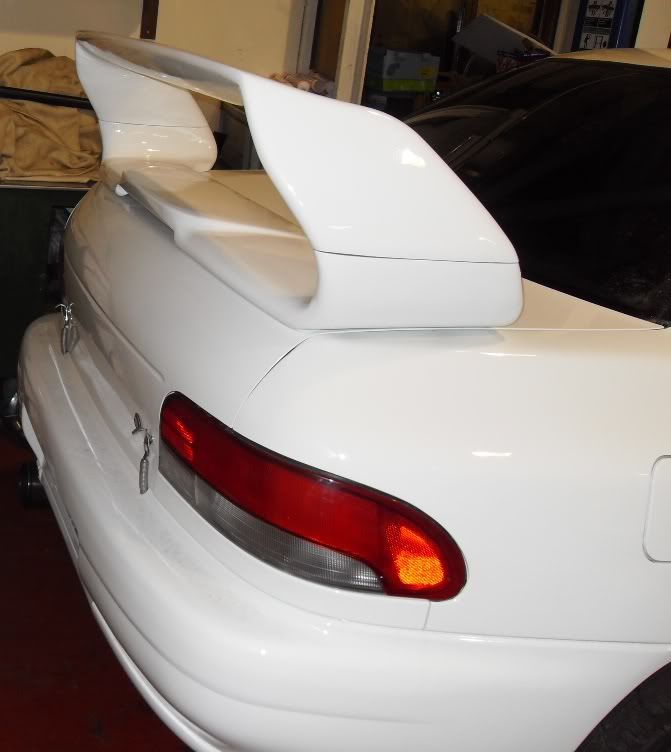 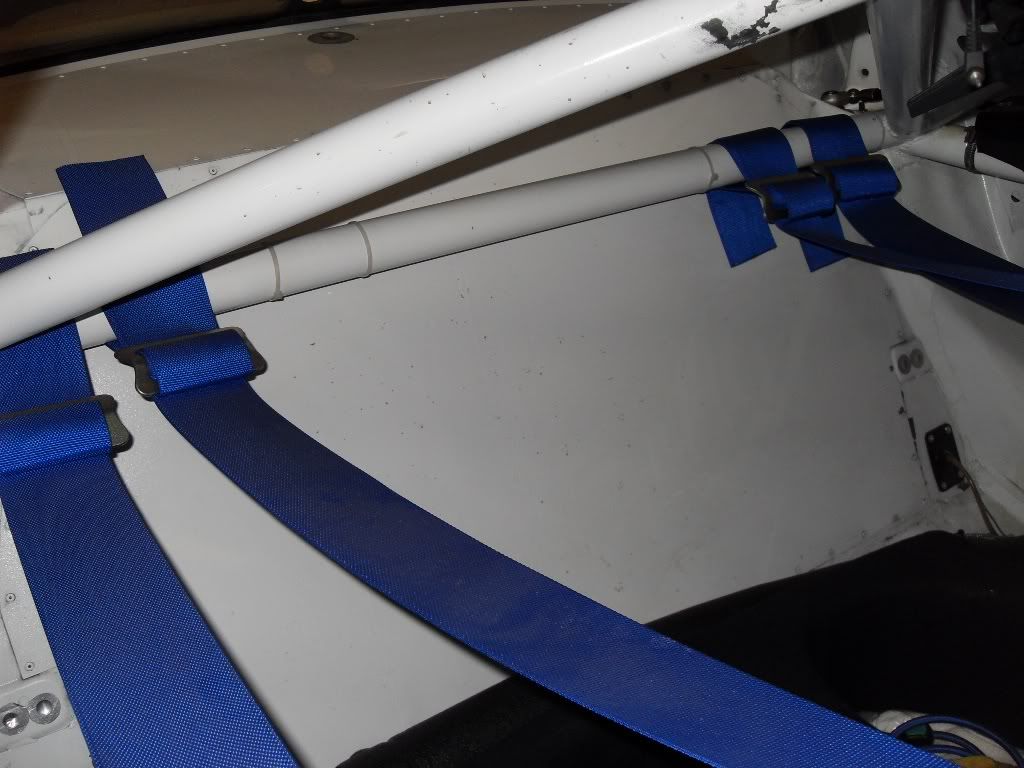  The shell will be taken straight to SPR Coachworks. They will be carrying out metal fabrication work including a wide body alteration. We are still currently looking at several different ideas but it will be 22B ish when finished. These works will also be detailed including photos within this thread together with Daz's engine build. We are aiming to finish the car within 2010. Will keep you posted........Clive 
|
|
#2
26-06-2010, 06:33 PM
|
|||
|
|||
|
Thanks guys.
I'll add to what Clive's just written. I'll be documenting every single step of the way with lots of pictures and lots of detail. The good thing about this is it will give everyone an insight into building a car from scratch and over a sensible time frame. This will also give me the opportunity to take the pictures of all components used and describe what I'm doing and why I'm doing it. Hopefully it will be educational for most With regard to spec I'll be brief until we know exactly what we are going to be purchasing but will be along the lines of: EJ22T Block EJ257 Crank Stroker Rods Stroker Pistons Ported AVCS heads with Double Valve Springs, titanium retainers Turbo will be in the rotated position and will probably be a Garrett GT3542R but that is subject to change. Transmission will hopefully be a Hawkeye Six speed (subject to finding one) Twin or triple plate clutch. Engine Management will be Syvecs. I'll update the thread with more detail once the parts have been ordered. To say I'm looking forward to this one is an understatement. It's going to be fun for all involved and hopefully you'll enjoy sharing the journey with us. Daz I'll be doing everything apart from body work and mapping oh and the driving. This is a real world budget it's just being done in a shortish space of time. Mine will have cost roughly the same by the time its finished but the difference is mine has taken two years. Costs are being kept to a minimum because of the work that gone on behind the scenes is quite intense. The spec of the car has been planned on paper long before any parts have been ordered. This helps because you can price up pretty much the whole project before you start. The parts I intend to use are tried and tested, there's nothing ground breaking so I dont have to do anything that's trial and error. It really is a case of just bolting it all together in the right manner. I honestly think the key to these things is to plan it before you start it. I know exactly in my head how I'm going to tackle this and know the sequence that I'm going to do things. This not only saves time but therefore money too. I'm not going to be listing individual prices for parts as that will be unfair on the suppliers involved but I am certain this car will be built within the budget intended. Daz....... Ready & setup to collect shell tomorrow. Leaving at 5.00am as I have tooooooo many miles to do. Clive....... Collected shell yesterday (thanks Sy & Daz). 16 hrs driving!. Much work to be done yet. Took shell to SPR today and discussed issues. 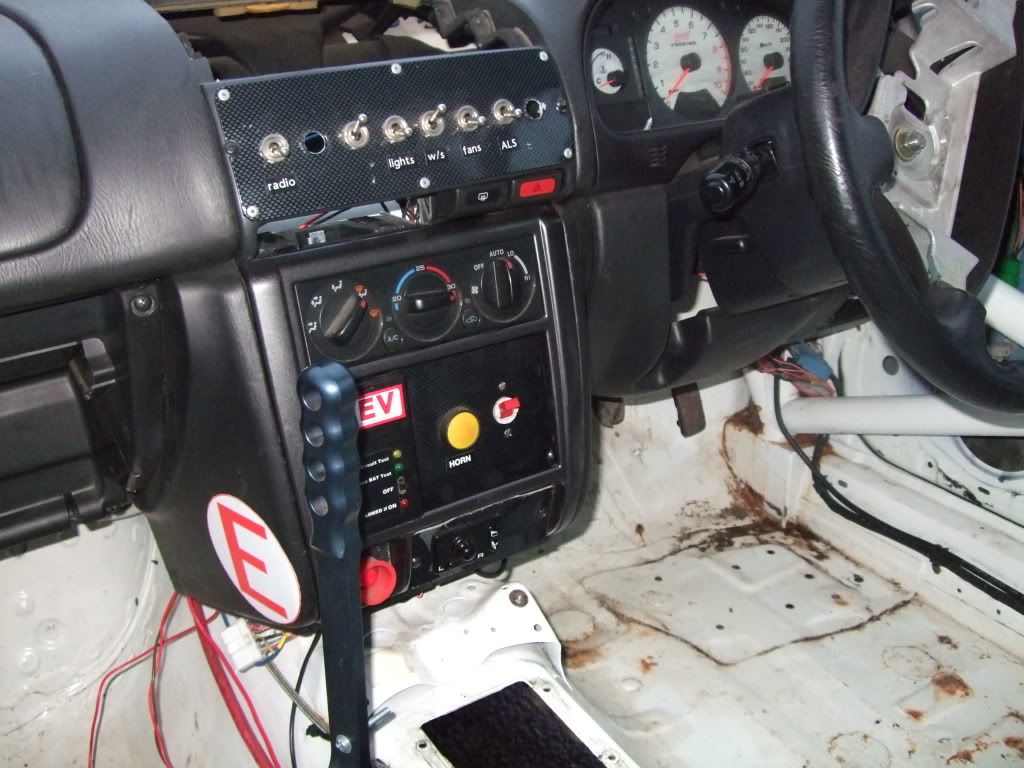  Heavy rain on the way home found a leak somewhere !! 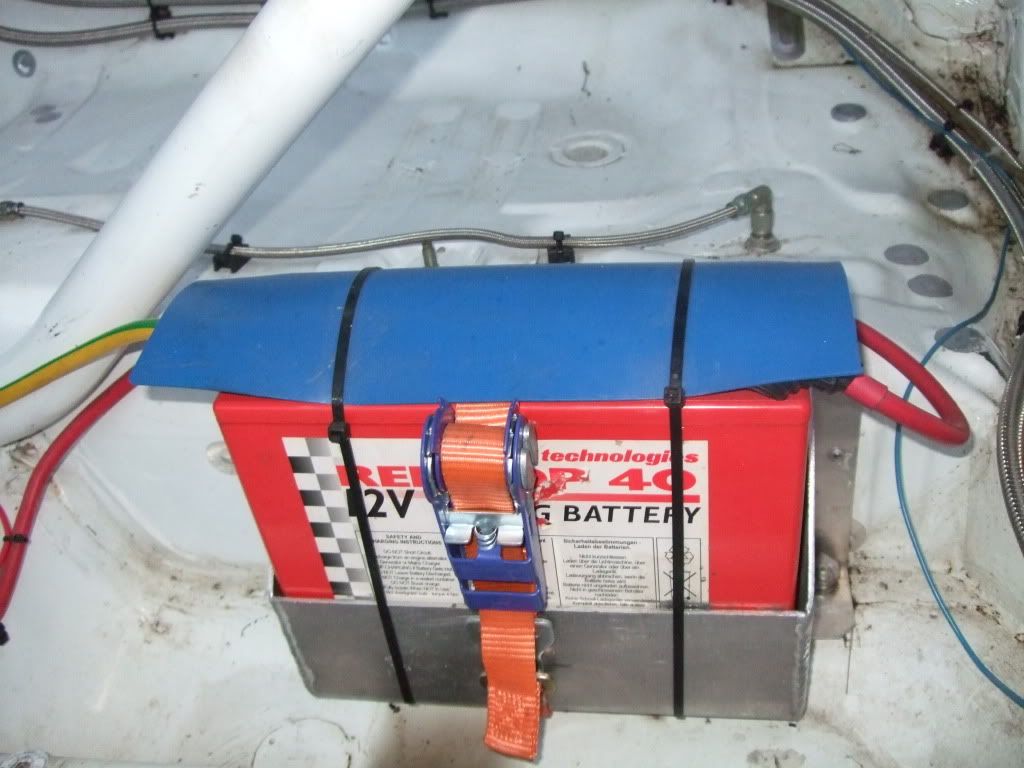 Discussing fibre glass arches, bumpers, seals etc / Flat bed floor alteration / diffuser / tanks etc. Clive....... The shell needs some work but has all the right parts and is an excellent base to start from. The water came from the roof scoop which was left open. Daz....... OK a little more info. Block is a 2.2CDB Crower\Lateral Stroker Rods Wiseco\Lateral 97.5mm Stroker Pistons Subaru OEM EJ257 Crank ACL Race Series Phase 2 Main bearings with additional phase 1 Centre Thrust bearing ACL race Series Big end Bearings. Engine Management will be Syvecs Fuel labs 1000bhp fuel pump Not sure what we're doing with fuel tank yet but have a few ideas. Clutch is an Exedy Twin Plate Heads have yet to be decided but I have choice of V3 heads, V5 heads or some AVCS(subject to finding some AVCS heads) Don't forget we're still in the planning stage. That should keep the interest up for now. Daz....... We've decided to use STI V 4 heads, these will be full monty heads, ported, polished, double valve springs titanium retainers and some proper cams. This will also save messing about with wiring looms and throttle bodies etc. I've bought a complete V4 STI engine that had a big end failure for roughly what a set of heads would cost I did this for two reasons: 1. It had the correct heads for the year of the shell and we needed a set of heads 2. It would have all the little bits and pieces for a rebuild such as all the sensors, cambelt covers, wiring looms, alternator, starter etc. This has saved an absolute fortune and also alot of time and hassle in trying to source all these bits and pieces seperately Clive...... ARCHES. mmmm undecided on what route to take regarding arches bearing in mind our budget. Having spent some time looking into this & discussing with SPR Coachworks we have 3 options. Option 1. Steel arched option will work out expensive. Option 2. Fibre glass kit is a couple of grand cheaper but having spoken to SPR the extra work involved making this option fit properly & look good when painted could equal the costs of the steel arch kit.  Option 3. Is this way. It will still serve the purpose of allowing a wider track and could save 2 - 3 K allowing that money to be spent elsewhere on the car. If this was done properly I think it looks pretty good. Clive........ Busy day today. Started with a knock at the door and a delivery consisting of 70kilos of parts from Lateral Delivered Today: 1 EJ22 Closed deck Block 1 EJ257 Crankshaft 1 set of ACL Race Series Big end bearings 1 Set of ACL Race Series Phase 2 Main bearings 1 ACL Race Series Centre Thrust Bearing 1 Set of Wiseco 97.5mm Stroker Pistons 1 Exedy Twin Plate Clutch 1 Solaris S6GP ECU Group N gearbox and engine mounts. Fuel Labs 1000bhp fuel Pump Fuel Labs Billet fuel filter. I've taken the block down to RCM for the required machining work. I've also bought a donor STI V4 engine for all the little bits and pieces a build like this requires. After discussing the build with Olly and Matt the spec of the car is pretty much finalised. More on this later meanwhile here are some pictures of todays parts arrival.         Daz.......
|
|
#3
26-06-2010, 06:33 PM
|
|||
|
|||
|
Few more boxes opened
Group N engine and gearbox mounts  Crank and Bearings  Niterided EJ257 Crank  Daz....... To give you guys an idea of costs, we are about 50% through the budget. 4K bought this STi 4 1998 RHD lightweight 2 door Type R shell Custom Cage fully welded Int. group N T45 cage strengthened strut tops strengthened flitch plates double skinned cills Alloy firewall seat rails doors with electric mirrors/glass with safety film Alloy bonnet facelift STi8 Scoop / bonnet pins & lamp pod fasteners boot with V6 STi spoiler, polycarbonate quick release side windows, laminated front screen rear tinted screen WRC roof vent modified wings to take 18" wheels sump guard mounting points front/rear bumpers facelift grill lights modified heater crossmembers dash modified steering column STi wiring loom with DCCD dash clocks/DCCD tank(no pump) wipers* -------------------------------------------------- Paid additional £ 1,150.00 for Walbro uprated fuel pump/ spec C intank pick up, braided aeroequip fuel lines Fuel pressure regulator(fuel labs) with pressure gauge FEV GTEC FIA approved electric plumbed in fire extinguisher system Red top battery/battery box/ Electric cut off switch and all wiring Bias Pedalbox/hydraulic handbrake and all braided hoses ------------------------------------------------------------- £ 6,584.18 bought this 1 EJ22 Closed deck Block 1 EJ257 Crankshaft 1 set of ACL Race Series Big end bearings 1 Set of ACL Race Series Phase 2 Main bearings 1 ACL Race Series Centre Thrust Bearing 1 Set of Wiseco 97.5mm Stroker Pistons 1 Exedy Twin Plate Clutch 1 Solaris S6GP ECU Group N gearbox and engine mounts. Fuel Labs 1000bhp fuel Pump Fuel Labs Billet fuel filter. ---------------------------------------------------------------- and £ 450.00 for Doner Engine ---------------------------------------------------------------- Total spent so far £ 12,184.18 inc vat. We are still confident we can do this within the budget. Clive......... Decision on turbo is made, GT35R with a billet wheel and the 0.82 housing no ifs no butts Daz...... The Exedy Twin Plate for Clive's has arrived today. I was looking at the ACT offering for mine. Would like to give one a whirl before shelling out for an Exedy myself. Daz...... Collected a donor engine last week. This is a complete STI version 4 unit and was purchased primarily because of the heads but it will also be useful for things like, throttle body, inlet manifold, wiring loom, cam belt covers etc. It was a bargain at £450 and will save time effort and money as I wont have to source all the little parts seperately.   I've also had the Exedy Twin Plate out of the box today and had a closer look at it. Wonderful piece of kit. Here it is all stripped down with picures of each component.         Clive...... P2 is in a quiet spell at the moment. EJ22 Block is being machined for the 79mm crank at Roger Clark Motorsport. Doner engine is being stripped and shell works are to commence. First on the shell is the rear floor section to be cut out and diffuser work. The existing rear floor section will be cut out and a new raised floor from the fire wall will be made. A new 28-30 Ltr fuel tanks will be positioned on new floor together with pumps/ fuel lines / swirl pot etc. (Tank yet to be decided). Next will be painting of the engine bay and inside of shell. Opted for the bolt on arches and a P1 style front bumper. Rear bumper will be staying as most of it will be cut out. Double skinned side seals will remain. Certain areas will need grinding and filling to achieve a good finish for paint. May require new bonnet but with new 22B style vent covers and reversed main scoop will be fixed. The work involved in removing the light pod bolts and prepping for paint may prove more cost effective to source another bonnet (awaiting quote). Still unsure on dash design. Clive...... A couple of pix of the shell at work as a rally car built for tarmac stages. 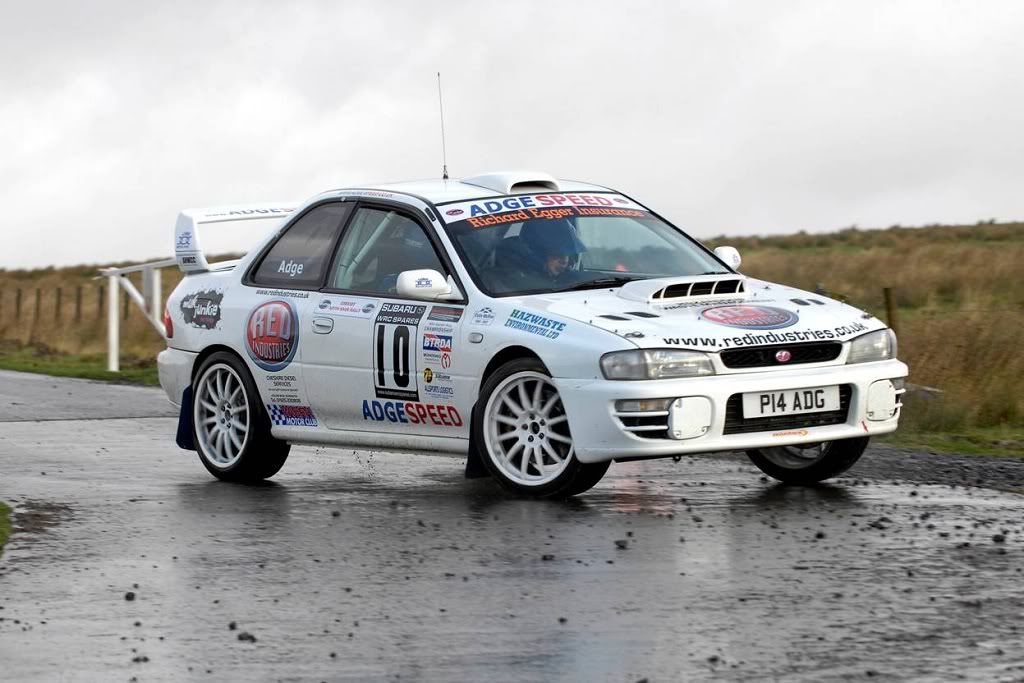 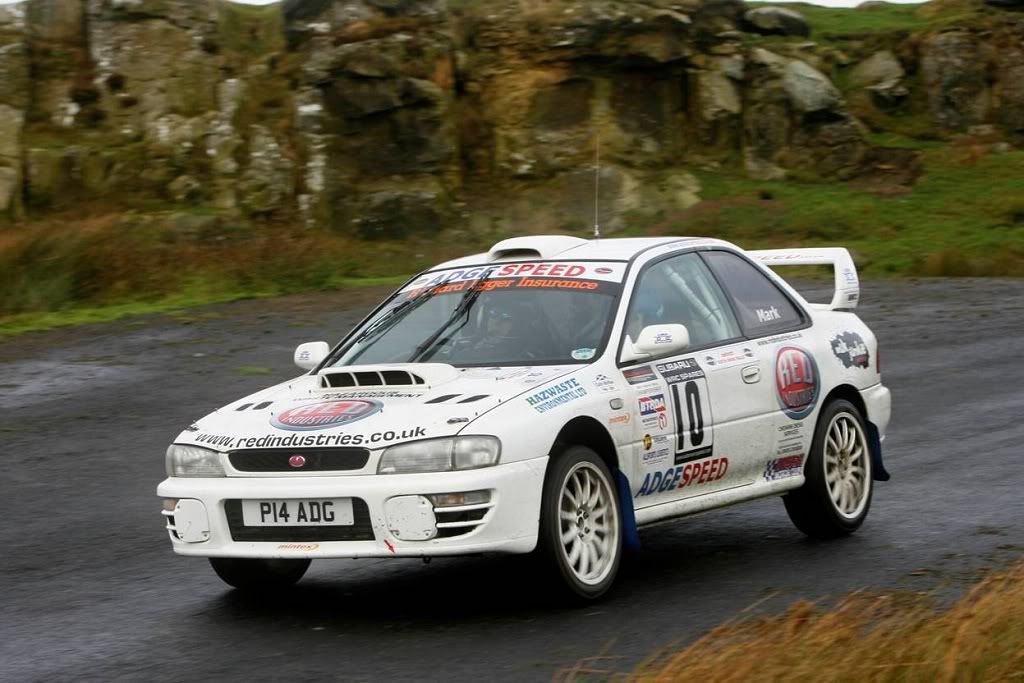 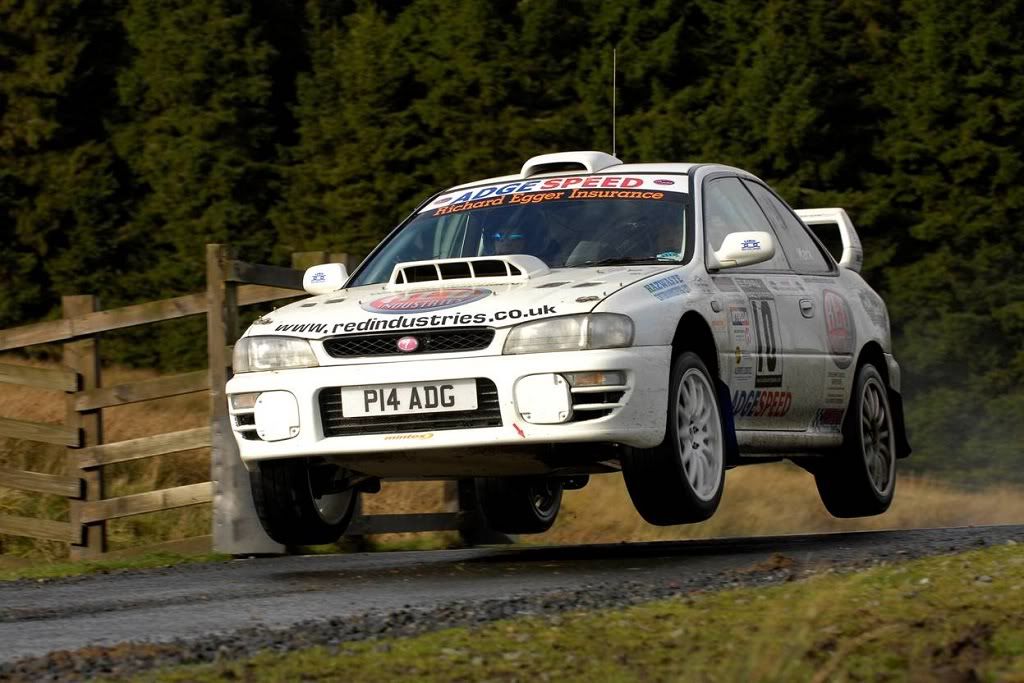 Talking with SPR Coachworks today and the shell work will be commencing late part of next week. clive.... Bought a new alley bonnet today as the work involved in putting the other one right would have virtually been the same dollar. Ordered reverse scoop too. Ordering 22B front bumper tomorrow together with bolt on arches. Pics & info regarding the work carried out on the shell will be up very soon. Clive..... Sorry about the lack of info but we are just in a bit of a dead zone at mo. Collect the alley bonnet this week and the reverse scoop from RCM has now also arrived. Will need to drive up to collect as damage is often the story when delivered. Block work is well under way and should be ready soon. This thread will be kicking some ass shortly Clive........ Can't win these days. I bought the only alloy bonnet in the UK from RCM for Project 2. Olly strongly advised that it be collected rather than delivered by courier. Using couriers a lot I fully realise the average delivery guy has the same IQ as the Common Fruit Bat, or is the kind of mutant that throws down your parcel gives you a pen to sign and mumbles something in Russian. So I spent £ 130.00 to pay a guy & fuel to collect it and take it to SPR Coachworks. (The guy was my son who works for me). Just had a call from SPR telling me one of the corners is bent over at 90 degrees Weather you live in Somerset or Newcastle, you will probably hear a distant scream from my son when I punch this left ear extremely hard Clive..... Nothing major to report. I have a straight forward rebuild on an STI 5 to finish this week and then it's down to RCM to collect the block that has been converted to WRC 14mm Head studs, converted to rear thrust, block faces skimmed and honed to suit each piston. One other development is that I've decided to swap the S6GP Syvecs/Solaris for a Plug and play one as it's the more sensible option now that we're not running AVCS heads. This makes wiring easier i.e there's hardly any to do. So the replacement Syvecs turned up this morning.  This goes into an OEM case.  But the OEM case needs a little work first. First step is to open the case up.  Then remove the OE ECU board.  Put the PnP Syvecs board in it's place.  The main ECU connectors are ok but the comms ports for the Syvecs meant that the OE case needed a little alteration. Time for the Dremmel, and to cut a small portion of the OE case away.  Voila!! One PnP Syvecs ready for fitting   Now what to do with the STI V3 ECU board, ah yes that's right, the bin as they are facking useless!! Daz.....
|
|
#4
26-06-2010, 06:34 PM
|
|||
|
|||
|
Exedy Twin Plate clutch was £ 1,042.56. I believe it may of been subject to some discount as we purchased other bits too.
P2 completion date? we are aiming at Christmas this year. Clive...... Right then, a little update I've been to RCM today and picked up everything I need to complete the bottom end build. First up is the EJ22 CDB, this has been modified for 14mm Headstuds, converted to rear thrust bearing, block faces skimmed, each cylinder has been honed per piston and finally a pre assembly clean. So basically it's ready to build.    I quite like this next one, Personally embossed with Clive's surname LOL  Next up was the RCM Baffled oil Sump    To compliment this, a Cosworth baffle plate which goes inbetween the sump and the block.   This is the best solutuion to prevent oil surge other than a full on dry sump set up. Oil Pressure will be monitored with the Syvecs datalogging so we can keep an eye on things. A whole load of seals, gaskets etc for the bottom end build.  A Modified RCM pump has been ordered. Here's a pic of the Wiseco Pistons, Matt has kindly already gapped the rings for me.  Finally, a new genuine Subaru water pump and Zero sports thermostat which opens slightly earlier to keep water temps down thus cooling the engine more effectively.  Frustratingly I'm just waiting for the Rods from Lateral to turn up which were ordered on the 12th Feb and through no fault of Mark's are still stateside being manufactured. As soon as they turn up the project can finally be started Daz....... I forgot that I had arranged to go to RCM tomorrow to drop the heads off for various machining to be done on them. So I started at 9pm with this.  and various stages over the next four hours ended up with completely stripped heads ready for RCM to go to work on. I got the bare heads boxed and ready to go at just gone 1am  Engine has been rebuilt at some stage but by some cowboys by the looks of it.    Heads pre porting  Stripped and ready to go   That's the horrible messy part over and done with. The next stage is to start rebuilding with all the new shiny bits Still waiting for the bloody rods to arrive though!!! Daz........ Just incase you guys think this project has come to a halt, far from it. Shell work is coming on nicely. You will find large updates opposed to frequent posts at this stage, but as the car starts to take shape the thread will start rockin. We are getting in front in order to post up complete items of the shell work ie Removal of rear floor section & diffuser construction / Engine Bay & Interior Prepping etc. Only have arches/bumpers & front slitter to buy to complete the shell Engine build has commenced today after Mr DaviEs spent yesterday turning the work area into a room that resembles a hospital recovery department, (something I may end up in myself if we have any more friggen parts from the US delayed Clive........ Here's all the short motor parts in various boxes and packaging prior to unpacking and cleaning.           Although the block has been machined for rear thrust bearing I have to do a little work in this area first. Firstly the centre thrust bearing needs to be ground on the thrust faces as the rear thrust bearing will be doing the work here and we dont want them working against each other. Secondly the phase 2 rear thrust bearing has a little location lug on it which is in the wrong place to pair up with the phase 1 block. This involves a very simple modification to the block to allow proper seating of the thrust bearing. Here you can see the lug on the phase 2 rear thust bearing clashes with where it should sit on the block.  and causes the bearing to not sit properly   The Culprit  The block and the lip that causes the problem  Here we see the Centre thrust bearing in situ which is correctly seated as the lugs are in the right place.   So the solution is a fairly simple one. I will grind the lug off on the rear thrust bearing. this will then be identical to the centre thrust bearing above.  Daz......
|
|
#5
26-06-2010, 06:34 PM
|
|||
|
|||
|
So tomorrow I'll do the required grinding and give the block yet another thorough wash before 1st proper assembly for measurements to take place
Daz...... First job this morning was to just grind off the offending lug on the block. Simple task and a 2 minute job with a dremel. So Before: After:  The bearing is now seated as it should be.    All main bearings in place.  Plastiguage cut off and positioned to measure the bearing oil clearance.   The other half of the block complete with the other half of the bearings was then put in place and torqued up to Subaru specs. This then squashes the plastigauge flat the size of which is compared to a chart and thus gives the bearing oil clearance measurement.  So I now know that the main bearing oil clearances are as follows: No.1 =0.035mm No.2 = 0.045mm No.3 = 0.045mm No.4 = 0.040mm No.5 = 0.035mm Next up Big end bearings. That's this afternoons job. Daz....... Right back to P2 Measured big end oil clearances also using plastiguage. The were all consistent and as they should be.  Rods and crank assembled and placed on block ready for the next stage.     Ok after lots of assembling, disassembling and measuring the short block is now finally built. The block required a bit of additional work to make clearance for the Crower rods. Although the crank would rotate through 360 degrees no problem when doing it by hand with a spanner on the crank I felt the smallest bit of resistance. This meant the block had to come apart yet again to allow for some material to be removed from the underside of the block. After the material had been removed the block was reassembled and the crank was rotated by hand, problem solved. So it was now time to build the block for one last final time. So EVERYTHING was cleaned and washed (where applicable) dried and blown over with an a burst of air from my compressor to get rid of any unwanted, lingering bits if dirt or swarf etc. Once I was happy that everything was clean enough i built the block up, fitted the modified RCMS oil pump, water pemp and finally the RCMS 14mm WRC headstuds.      The next job will be to collect the heads from RCM following their Team Ice Port and polish, one piece bucket conversion, bronze valve guide conversion, head skim and 14mm stud conversion. So I'll collect the heads and all the valvetrain components at somepoint this coming week. Daz..... *****WARNING AUTOMOTIVE PORN***** Ok a bit of an exageration but none the less you have been warned I've been down to RCM today to collect the heads for this build. I knew they'd be good but even my expectations were exceeded today. These heads is where a large part of the budget has gone. They have had the following done: Team Ice Large Port Conversion Team Ice Port and Polish WRC Combustion Chamber Conversion High Lift Cam Conversion One peice bucket conversion Bronze Valve Guide Conversion Head face Skim WRC Inlet and Exhaust Valves High Lift Cams Double Valve Spring Kit Titanium Retainers Double Spring Spacer I've also ordered a set of Vernier Cam Pulleys which will be here next week. Assembly of this lot will start next week when I collect the spring spacers, vernier pulleys and modified head gaskets (14mm head stud ream) Without further a do the promised automotive Porn...     [IMG] http://www.scoob.co.uk/p2/235build/55.jpg [/IMG] [IMG] http://www.scoob.co.uk/p2/235build/56.jpg [/IMG] [IMG] http://www.scoob.co.uk/p2/235build/57.jpg [/IMG] [IMG] http://www.scoob.co.uk/p2/235build/58.jpg [/IMG] [IMG] http://www.scoob.co.uk/p2/235build/59.jpg [/IMG] [IMG] http://www.scoob.co.uk/p2/235build/60.jpg [/IMG] [IMG] http://www.scoob.co.uk/p2/235build/61.jpg [/IMG] [IMG] http://www.scoob.co.uk/p2/235build/63.jpg [/IMG] [IMG] http://www.scoob.co.uk/p2/235build/64.jpg [/IMG] OK, After today's visit to RCM I now have everything I need to complete the engine build What's in the box? [IMG] http://www.scoob.co.uk/p2/235build/65.jpg [/IMG] [IMG] http://www.scoob.co.uk/p2/235build/66.jpg [/IMG] [IMG] http://www.scoob.co.uk/p2/235build/67.jpg [/IMG]    and finally some 1.6mm thick 98mm dia Cometic Head Gaskets  Both block faces and heads have been skimmed and the chambers have been matched to the bigger bore size. I'm going to measure the combustion chamber tomorrow and work out the exact comp ratio now that I have the heads back in my posession. I'm not expecting them to be too far out but will know exactly what they are tomorrow. Daz....... I will be collecting the shell from SPR Coachworks this coming Saturday then heading Norf to drop it off with Daz for some trial fitments as recommended from RCM. The shell has not received too much work as of yet due to other commitments but SPR said a month up Daz's will be good to allow them to shift other customers work and they intend to hit P2 on it's return. I've CC'd the cylinder heads this afternoon which for those that don't know is working out the volume of the combustion chamber. Grease to seal around the bore.  Mulitpack CD cover ideal for this job  Fill the sealed hole with fluid   It took 47cc of fluid to fill the sealed chamber and the piston dish is 20cc. So with the 1.6mm thick gaskets this gives us a compression ratio of 8.45:1 or thereabouts. That will do nicely Daz........ Just collected the rolling shell all trailered up ready for a 4.00 am start up to DD's. Will be leaving it there for a month or more so Daz can trial fit the motor, box and everything else. All the braided is being removed (fuel, fire eater system, hydraulics (handbrake) etc and staying with Daz. When he is happy I'll have the 22B bumper / splitter and arches waiting at SPR Coachworks. New bonnet & reverse scoop is already there. Just need Turbo, headers, exhaust, seats, harnesses, suspension, brakes, wheels, toilet roll holder and a few other bits. The next time Daz sees the shell it will be all lovely and shiney and ready to fit all that has been tried & tested. Will then be off to the boys at RCM to do their stuff checking, balancing, alignments, mapping etc. Running in will be on a dyno, not roads. Decided on a cool colour scheme but not telling a soul unless advanced cash payment are extremely high There will be 4 names (decals) very evident on the finished car, all of who had major parts & one long term sponsor. All down to me then to learn the cars feel, find it's limits (that will be a fookin laugh knowing how mental the P1 is) Should have the best part of 650 Bhp weighing in around the 1100 kgs mark) YEEEEEE FKN HAAAAAAAAAA Clive......
|
|
#6
26-06-2010, 06:35 PM
|
|||
|
|||
|
The Shell has arrived today. Being able to look at it properly instead of a 5 minute look on the back of a trailer has given me a good insight of what needs doing.
It will also give you guys a good idea of just how much work is involved in building a car like this. Ok then without any more waffling here's some pics:                    Daz....... Remember this page (14) as these pictures can be compared to the finished item. Spent a couple of hours with DD (Daz DaviEs) having collected the shell from SPR and dropping it off with Daz. 460 miles later I was home. I think Daz has been looking forward to having the shell oop Norf with him, as I caught a couple of private grins Now decided to ditch the 22B front bumper idea. Is now going to be P1 front inc splitter. Wide arch (bolt on) will remain. BC Coilovers will be ordered soon together with brakes (undecided). Things will start to move a little better from now on. Ok guys this is a full run down of purchases and engineering so far. SHELL STi 4 1998 RHD lightweight 2 door Type R shell Custom Cage fully welded Int. group N T45 cage strengthened strut tops strengthened flitch plates double skinned cills Alloy firewall seat rails doors with electric mirrors/glass with safety film Alloy bonnet facelift STi8 Scoop / bonnet pins & lamp pod fasteners boot with V6 STi spoiler, polycarbonate quick release side windows, laminated front screen rear tinted screen WRC roof vent modified wings to take 18" wheels sump guard mounting points front/rear bumpers facelift grill lights modified heater crossmembers dash modified steering column STi wiring loom with DCCD dash clocks/DCCD tank(no pump) wipers* Walbro uprated fuel pump/ spec C intank pick up, braided aeroequip fuel lines Fuel pressure regulator(fuel labs) with pressure gauge FEV GTEC FIA approved electric plumbed in fire extinguisher system Red top battery/battery box/ Electric cut off switch and all wiring Bias Pedalbox/hydraulic handbrake and all braided hoses Block Face Skim 14MM Stud conversion RCM Rear thrust conversion Rebore block to piston (Clearance to be confirmed). Clean,check,inspect block halves ready for assembly Used EJ22 closed deck block, stripped, cleaned, 2.5lt STI 79mm crank Lateral/Wiseco custom 2.35lt piston kit, with up rated pins Custom ceramic coated piston crown, and low friction skirt Lateral/Crower "H" section stroker rods, Cosworth multi layer steel head gaskets (pair) 1.1mm Roger Clark 14mm head stud kit Modified 14mm block dowels ACL Race series main bearings, phase 2 (set) ACL Race series centre main ACL Race series big end bearings (set) Cosworth Kevlar timing belt Engine build parts, oil filter, etc (subject to final spec) Fuelab 1000bhp pump Fuelab billet filter Exedy twin Plate Clutch (6 speed) Group N Engine & gear box Mounts (set of 3) Syvecs S6GP, connector, & pins, Map sensor RCM Bucket Shim Head Conversion Head Face Skim RCM High Lift Camshaft clearance conversion RCM Combustion Chamber Conversion to 97mm bore RCM Team Ice Big Port Conversion (With ST Valves- Option A) RCM Bronze Inlet Valve guide- With Option A RCM Bronze Exhaust Valve guide- With Option A Head Drilling for 14mm stud kit Aluminium Bonnet RCM GRP Reversed Bonnet vent RCM/K&N Induction Filter RCM 100mm Induction Trumpet RCM 100mm Induction Hose Red 100mm Stainless steel Induction Hose Clamp RCM Tubular Manifold- Unequal length- Option A RCM Manifold fitting kit Ceramic Coating of Exhaust manifold & Up-pipe RCM 14mm Head stud kit RCM 14mm Head Dowel RCM Modified 10mm Oil Pump Block O ring Orange Block O ring Block Case Dowety Seal Front crank Oil seal Rear Crank Oil Seal Gudgeon Pin Seal Inspection O Ring seal Three Bond Grey Sealer Inlet Manifold Gaskets Water Pump Gasket Water Transfer Seal Half Moon Seal Spark Plug Gasket - to confirm Rocker Bolt Seal RH Rocker Cvr Gasket- to confirm LH Rocker Cvr Gasket- to confirm Uprated 78 Degree Thermostat Cosworth Baffle Plate RCM Baffle sump Dash 8 Return Option A Male Male adapter Samco Hose Kit Heater Matrix Samco Hose Kit top & Bottom Rad Hose RCM Vernier Cam pulleys V3/4 Steel Cosworth Timing Belt RCM Titanium Retainer RCM Double Valve spring set RCM Double Valve spring Spacer 3" Exhaust Gasket Timing Belt Idler Toothed Engine Idler Tensioner Tensioner Idler RCM Aftermarket Timing Belt kit V1-2- Best Option!!! Used Tensioner Bracket V3/4 HT Lead 2 V3/4 HT Lead 3 V3/4 HT Lead 4 V3/4 Coil Pack New NGK Running In Spark plug Head Gasket 97MM Bore to be confirmed 6 Speed DCCD Gear Box-Prop-Linkage Oil Filter Genuine Subaru Water pump Oil Filter Oil pick up O ring Water pump seal RCM V3/4 High Lift Camshaft Kit BC ER Coil Over Set Garret GT35 Turbo b/wheel 0.82 Exhaust Subaru V5 front bumper Turbo kit / up & down pipe / screamer pipe / 38mm w/gate / ceramic I'll be honest and say we will not achieve a finished race car for the 25K we initially aimed at. We wont be that much over when finished. Additional costs were decided to be spent in making the engine strong opposed to buying 2nd hand parts or opting for cheaper (that will do) parts. The work of the heads & block are the only areas we have over spent. I dare say there will be race prepared cars out there that have been cheaper but when complete this car will be reliable & fairly strong. RCM I must say are doing a sound job on sourcing parts for us and have played a big part in keeping the project flowing. Daz Davies is still flat out & will be posting more pics & updates shortly. Clive....... Things are really picking up momentum now with lots going on behind the scenes. The last couple of days have seen me building the heads up and measuring valve clearances. With the lifters we are using it's not just a case of measuring and then finding the right shim or grinding a shim down to size. The lifters themselves are just one piece i.e not a lifter and a shim. This means that the lifters come in different sizes. So I've assembled the heads today put the head gaskets on and then torqued the heads down. I've then put four lifter of the same size on each cam and then taken measurements. So I have today ordered 16 brand new one piece lifters according to the measurements i've taken. Once I get those its a case of fitting them refitting the RCM cams and remeasuring clearances again to make sure they are correct. I dont just want these within tolerance I want them all bang on. Anyway here's some pics: Head and components laid out all ready for assembly     [IMG] http://www.scoob.co.uk/p2/235build/79.jpg [/IMG]     Moving on with the build. I've started to build the rest of the engine up. The water cross pipe was tatty so that got a couple of coats of VHT wrinkle paint.    Next up is the inlet manifold which really is tatty. So it got stripped and ready for painting. Before:   During:   [IMG]http://www.scoob.co.uk/p2/235build/91.jpg Painted:      Just need to let it dry now for it to "crinkle" More pics when it's done so. Daz........
|
|
#7
26-06-2010, 06:36 PM
|
|||
|
|||
       I've been to RCM today to try the seats for size. The passenger seat is a perfect fit nice and snug and no movement.  I also had the opportunity to try Clive's seat which is one of those that you sit in and it's moulded around you for the perfect fit. A bit on the wide side for me but I'm told it fits Clive incredibly well.  Picked up a load more parts from RCM today. I no longer have a dining room I do have a P2 store room though.                 Finally a set of BC ER series Coilovers. I have to say the photos don't do these justice they are just such high quality and look to be put together incredibly well. They are superb value for money!!!      turbo     I've also managed to get the N/S High Lift cams on tonight, torqued down and re checked the clearances and was happy to have my original measurements confirmed. With the correct sized shims everything is now within tolerance.  
|
|
#8
26-06-2010, 09:09 PM
|
|||
|
|||
|
Looking good Daz and Clive
Good choice with turbo and engine spec, almost the same as mine which made an easy 640/550 with vpower+meth Sorry I did not text you back Daz by the time we were back in phone range it would have been to long to have been any help I think
|
|
#11
28-06-2010, 08:52 AM
|
|||
|
|||
|
What a thread, I need to go home now and have a
  Fantastic stuff 
|
|
#12
14-07-2010, 06:21 PM
|
||||
|
||||
|
Popped up RCM today & collected these.
C/F door cards front & rear (2 door)   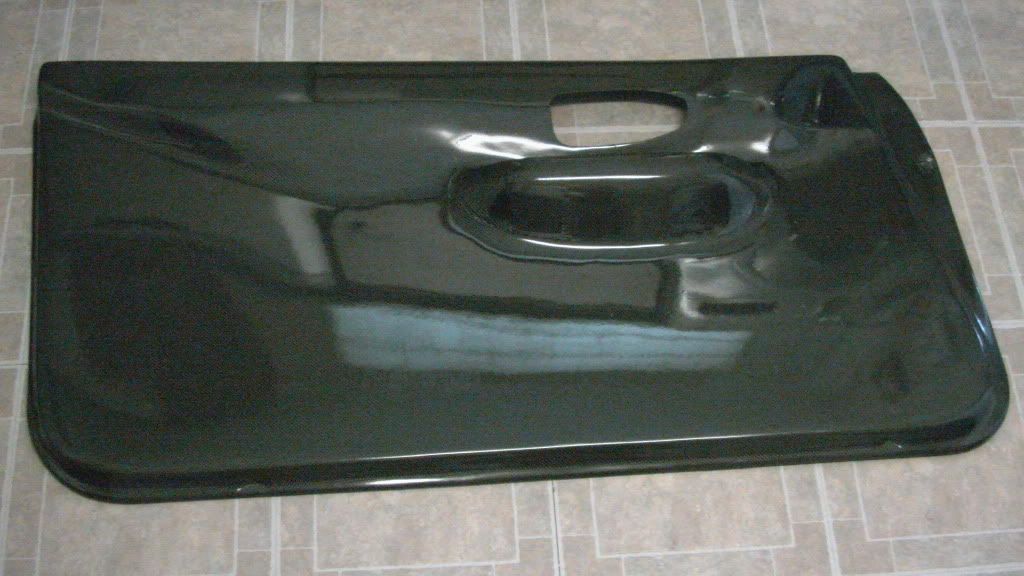 Two seats. 1 size L & 1 size FB 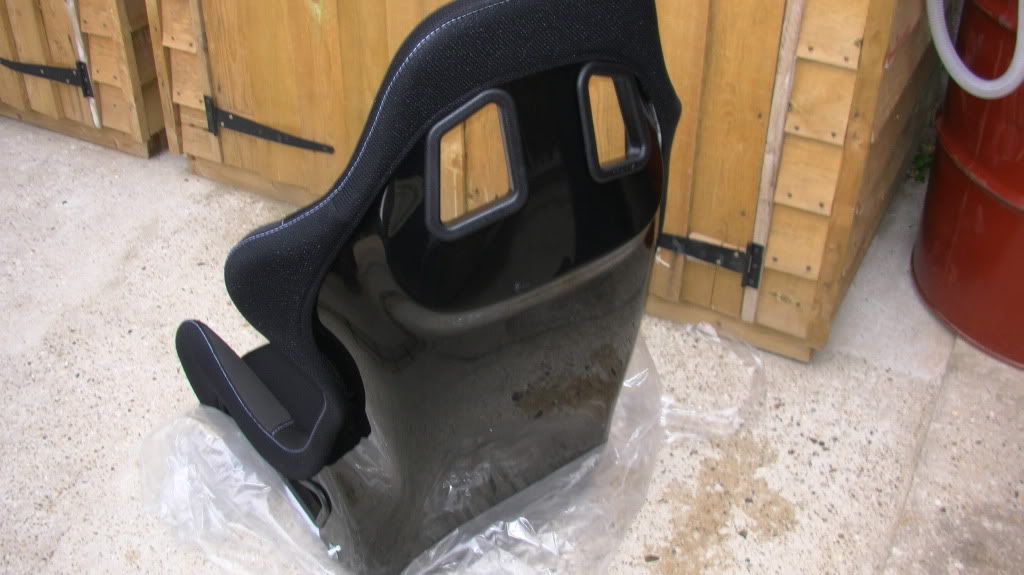 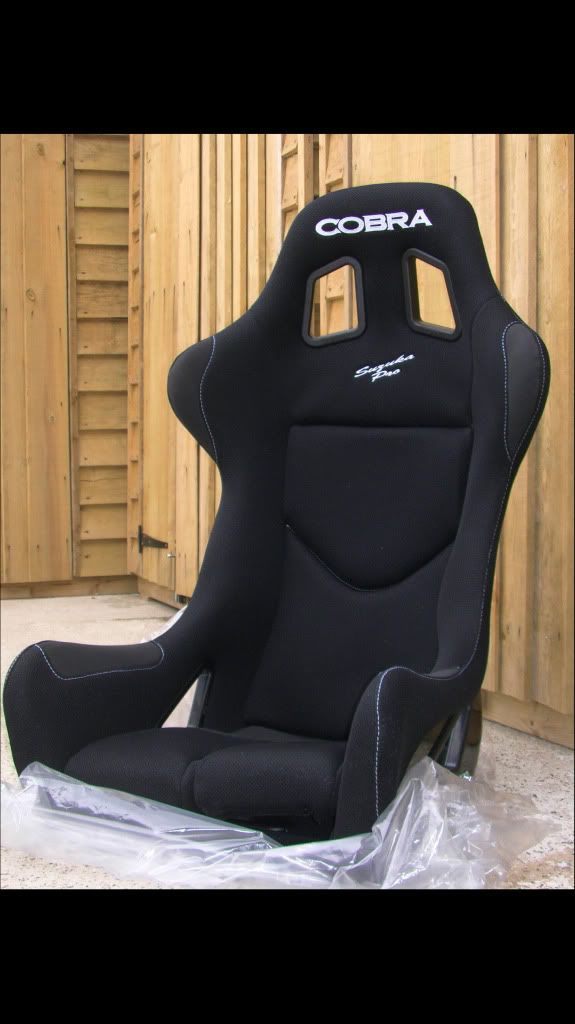
|
|
#13
14-07-2010, 06:38 PM
|
|||
|
|||
|
Thats porn
|
|
#14
14-07-2010, 07:07 PM
|
||||
|
||||
|
Quote:
absolutely....this thread is ace! 
|
|
#15
14-07-2010, 07:36 PM
|
||||
|
||||
|
unbelievable thread, good reading guys.

__________________
10 Years of Scoobies:04 WRX SL, 06 HAWK STI, 97 JDM WRX STI WAGON, 05 WRX STI, MK3 FOCUS RS, now Porsche Cayman S
|
|
#17
14-07-2010, 10:02 PM
|
||||
|
||||
|
The engine will be finished very soon. Were waiting on shims but Olly posted them to Daz today.
The engine/box/induction / up-down pipes / headers / exhaust / oil cooler / IC etc will have a trial fitting. When all is well it;s all stripped down again and completely stripped. All relevant holes in engine bay that are not required will be encircled in red. These will be plated by SPR when prepping for the paint. The new suspension will be fitted together with the new wheels/tyres then I will collect from Doncaster & return it to SPR in Uckfield. They will then fit new bumpers / splitter / bonnet / reverse scoop / and can achieve correct cutting or arches & fitting of wide arches. Allowances for additional weight will be made. (engine / box etc) When built & prepped it will be painted Then back up to Doncaster for the final assembly. Jolly Green will be fitting the ECU and mapping the car initially then sorting out 20% Meths. When completed it;s off to RCM to have the suspension & alignment sorted together with a full Matt Clark inspection (and does he inspect!) He will check every mm of the car. Onto a dyno for a 400 mile running in period, followed by adjustments & more running in. Then the fun starts. I have been assured by all involved that this thing will be quick, and will be running between 640 - 650 @ the f/wheel, so power to weight should be really cool. The good part is that the engine has been built with a lot more power in mnd. A Gt40 - 48 with the RCM NOS system can be fitted with very little else to do. 
Last edited by Skullfudge; 14-07-2010 at 10:04 PM.
|
|
#19
15-07-2010, 12:14 AM
|
||||
|
||||
|
Quote:
Thanks Belliot. Well, I'll be doing a fair bit of testing at Brands when finished so one day get yourself there & you can jump in for a few laps
|
|
#20
15-07-2010, 09:02 AM
|
|||
|
|||
|
I would love to be there to snap a few pics if possible?
|
|
#21
15-07-2010, 09:34 AM
|
||||
|
||||
|
Quote:
At Brands Steve ?
|
|
#22
15-07-2010, 09:52 AM
|
|||
|
|||
|
Quote:
|
|
#23
15-07-2010, 09:54 AM
|
||||
|
||||
|
Quote:
|
|
#24
15-07-2010, 09:55 AM
|
|||
|
|||
|
Quote:
|
|
#25
15-07-2010, 10:36 AM
|
|||
|
|||
|
Quote:
|
|
#26
15-07-2010, 01:21 PM
|
||||
|
||||
|
WOW!!!! Now that is what i call a project....
__________________
1.6 Terzo........ Non turbo.............http://www.surreyscoobies.co.uk/foru..._vehicle&id=87
|
|
#28
15-07-2010, 01:44 PM
|
||||
|
||||
|
More pic will be coming shortly as Daz will be on final stages of engine build over the coming weekend.
I never realised there was so much involved in building a car from scratch! Not just bolting everything together but lots of time spent making sure everything fits with everything else. Never realised how many were following this project. Many strangers ask me how P2 is getting on at events/shows etc and replying to pm's, emails etc is now a daily task Still working on final appearance as several names will be on finished car.
|
|
#29
15-07-2010, 01:50 PM
|
||||
|
||||
|
Its all worth it in the end, my project was no where near as detailed as this but i do know that there is a lot of concentration needed when putting it all back together.
But i am sure you will be grinning like a chessher cat once complete!!!! Really can not wait to see the end result...
__________________
1.6 Terzo........ Non turbo.............http://www.surreyscoobies.co.uk/foru..._vehicle&id=87
|
|
#30
15-07-2010, 03:38 PM
|
||||
|
||||
|
Quote:
Should result in a quick machine
|
|
#32
17-07-2010, 07:12 PM
|
||||
|
||||
|
(ignore the arches, I was forced to do them by hand)
This will provide you with a rough idea of what P2 will look like when completed. It won't be exactly the same, but the theme will be. There will be other company decals on the finished car. SPR Coachworks = Paint Samco = Supplied all requirements free Maybe more to come. All grey will be in the RB5 grey. Body will be in Audi Diamond white. Yellow is the same as my company colour, That will also be on there. 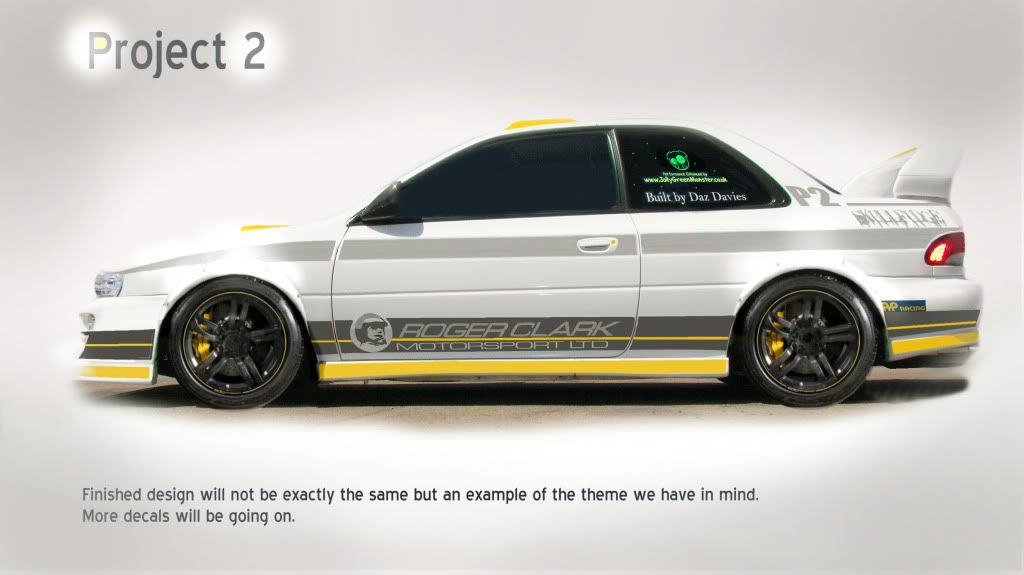 What ya reckon chaps ?
|
|
#34
17-07-2010, 10:41 PM
|
||||
|
||||

|
|
#36
19-07-2010, 03:07 PM
|
|||
|
|||
|
That is looking the nuts Clive.
|
|
#37
21-07-2010, 10:10 PM
|
||||
|
||||
|
UPDATE: A majority of P2 has now been purchased (thank god). With business as bad as what it is, projects like this don't mix to well ! Only a few bits & pieces left now. Daz will be briefing you within the next two days of some changes that will result in more power. For those of you that are interested, this is the current list to date. (Everything purchased) No particular order due to spreadsheet format copied from. SHELL STi 4 1998 RHD lightweight 2 door Type R shell Custom Cage fully welded Int. group N T45 cage strengthened strut tops strengthened flitch plates double skinned cills Alloy firewall seat rails doors with electric mirrors/glass with safety film Alloy bonnet facelift (SOLD) STi8 Scoop / bonnet pins & lamp pod fasteners boot with V6 STi spoiler, polycarbonate quick release side windows, laminated front screen rear tinted screen WRC roof vent modified wings to take 18" wheels sump guard mounting points front/rear bumpers facelift grill lights modified heater crossmembers dash modified steering column STi wiring loom with DCCD dash clocks/DCCD tank(no pump) wipers Walbro uprated fuel pump/ spec C intank pick up, braided aeroequip fuel lines Fuel pressure regulator(fuel labs) with pressure gauge FEV GTEC FIA approved electric plumbed in fire extinguisher system Red top battery/battery box/ Electric cut off switch and all wiring Bias Pedalbox/hydraulic handbrake and all braided hoses Aluminium Bonnet Reverse Bonnet Scoop Subaru V5 front bumper RH Carbon Door card RH Carbon Rear 1/4 cardLH Carbon Door card LH Carbon Rear 1/4 cardCobra Competition Seat Cobra Competition Seats seat railsMomo Steering wheel boss Momo Suede steering wheel Momo steering wheel boss Seat Belts 3" 6 point harness Flocking of dashboard (to be done) ENGINE and TRANSMISSION Used EJ22 closed deck block, stripped, cleaned, 2.5lt STI 79mm crank Lateral/Wiseco custom 2.35lt piston kit, with up rated pins Custom ceramic coated piston crown, and low friction skirt Lateral/Crower "H" section stroker rods, Cosworth multi layer steel head gaskets (pair) 1.1mm Roger Clark 14mm head stud kit Modified 14mm block dowels ACL Race series main bearings, phase 2 (set) ACL Race series centre main ACL Race series big end bearings (set) Cosworth Kevlar timing belt Engine build parts, oil filter, etc (subject to final spec) Fuelab 1000bhp pump Fuelab billet filter Exedy twin Plate Clutch (6 speed) Group N Engine & gear box Mounts (set of 3) Syvecs S6GP, connector, & pins, Garrett Hybrid GT35 (Billet wheel) Turbo Turbo Kit /up & down pipe / 38mm w/gate / all ceramic Ceramic Coating of Exhaust manifold Ceramic coating Tubular Manifold Hybrid GT3 Inter cooler RCM Super-Light Pulley set RCM Track Attack Oil Catch Tank Kit (With Drain Back) STI Pink Trailing arms Spherical Brg Stud for starter motorRH Rocker Cvr Gasket- to confirm Rocker Bolt Seal Samco Hose Kit Heater Matrix Samco Hose Kit top & Bottom Rad Hose Spark Plug Gasket - to confirm Tensioner Tensioner Idler Three Bond Grey Sealer Timing Belt Idler Toothed Engine Idler Uprated 78 Degree Thermostat Used Tensioner Bracket V3/4 Coil Pack New V3/4 HT Lead 2 V3/4 HT Lead 3 V3/4 HT Lead 4 Water Pump Gasket Water pump seal Water Transfer Seal Male / Male Dash 4 take off Boost control Nut for starter motor Oil Cooler Modine Oil Filter RCM Cool panel Guide RCM Thermostatic Oil Cooler KitRCM Bucket Shim Head Conversion RCM Combustion Chamber Conversion to 97mm bore RCM Double Valve spring set RCM Double Valve spring Spacer RCM GRP Reversed Bonnet vent RCM High Lift Camshaft clearance conversion RCM Manifold fitting kit RCM Modified 10mm Oil Pump RCM Rear thrust conversion RCM Team Ice Big Port Conversion (With ST Valves) RCM Titanium Retainer RCM Tubular Manifold- Unequal length- RCM V3/4 High Lift Camshaft Kit RCM Vernier Cam pulleys V3/4 Steel RCM/K&N Induction Filter Rear Crank Oil Seal Rebore block to piston (Clearance to be confirmed).NGK Running In Spark plug Oil Filter Oil pick up O ring Orange Block O ring RCM 100mm Induction Hose RCM 100mm Induction Trumpet RCM 14mm Head Dowel RCM 14mm Head stud kit RCM Aftermarket Timing Belt kit V1-2- RCM Baffle sump Dash 8 Return RCM Bronze Exhaust Valve guide- With Option A RCM Garret GT35 Turbo 0.82 ExhaustLH Rocker Cvr GasketCosworth Baffle Plate Cosworth Timing Belt Front crank Oil seal Genuine Subaru Water pump Gudgeon Pin Seal Half Moon Seal Head Drilling for 14mm stud kit Head Face Skim Head Gasket 97MM Bore to be confirmed Inlet Manifold Gaskets Inspection O Ring sealAlloy Boost take off Block breather EJ22 Engine Bucket Shim 100mm Stainless steel Induction Hose Clamp 14MM Stud conversion 3" Exhaust Gasket 6 Speed DCCD Gear Box-Prop-Linkage Reverse Bonnet Scoop BC ER Coil Over Set Block Case Dowety Seal Block Face Skim Block O ring Frosts Crinkle Paint (black) 16 ft Brian James Amax trailer As previously mentioned the budget has expired. +15K will complete the car. Shell booked in for Sept 1st for the paint. Looking forward to jumping in this bugger
|
|
#39
22-07-2010, 05:57 PM
|
|||
|
|||
|
I have just noticed something about the seats.
FB size? They would be more suitable for me than you mate. Or does FB not mean Fat Bastard?  
|
|
#40
22-07-2010, 06:40 PM
|
||||
|
||||
|
Quote:
Fat Bastard. That's Daz's passenger seat
|
|
#41
25-08-2010, 10:14 AM
|
|||
|
|||
|
Holy sweet jesus. That's a project!!
Good luck sir. Steve
__________________
Long live the Gimps!! http://uk.youtube.com/watch?v=Cphs2DpdPCw
|
|
#42
31-08-2010, 10:00 AM
|
||||
|
||||
|
We were initially heading at 640 - 650 Bhp but recent developments now suggest that on 20% Meths we should be a tadge over 700.
|
|
#43
31-08-2010, 09:28 PM
|
|||
|
|||
|
What a bugger huh? lol
Nice one matey. Steve
__________________
Long live the Gimps!! http://uk.youtube.com/watch?v=Cphs2DpdPCw
|
|
#45
01-09-2010, 10:32 AM
|
||||
|
||||
|
Quote:
Hi Mike hows you mate?. You think I may need a triple? is that what you have? or are you saying this as you have a twin plate & you feel you need a stronger one? It was yours & Jazz's cars that determined my thoughts of making 700 with P2 as the builds are similar.
|
|
#46
01-09-2010, 05:02 PM
|
|||
|
|||
|
I am good thanks
I think a twin plate will not cope mine is a triple plate exedy semi carbon. But it is now slipping. It is pritty old it used to be in terry b race car. Will be changing to a carbonetic triple, full carbon when it arrives
|
|
| Currently Active Users Viewing This Thread: 1 (0 members and 1 guests) | |
|
|


