
|
|
#1
 18-01-2018, 04:32 PM
|
||||
|
||||
|
Sooo, I always like this part of owning a new car, deciding what mods to buy for it!
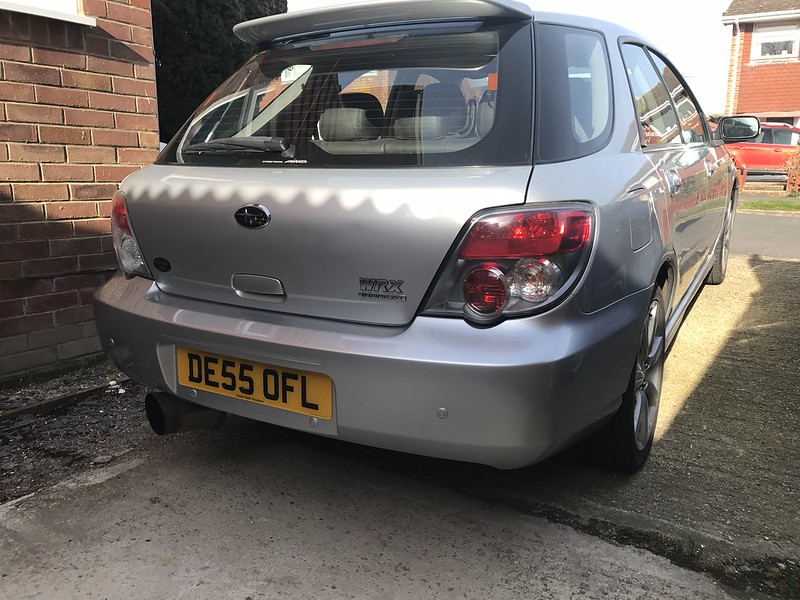
Last weekend myself and my wife decided we needed something bigger as we now have an 8 month old, I was currently driving a JDM 1996 Honda Integra DC2 Type R. I love the car loads but unfortunately it was time to move on. The Wife's criteria was something bigger so we were able to use as a family car, my criteria was something faster as I've never owned a turbo'd car! After a little searching I stumbled across a 2006 Impreza WRX Wagon for sale on the local selling pages, after studying the pictures I decided to go and see the car for myself. Needless to say after the first test drive I was hooked! Bodywork is acceptable for its age, a minor scuff on the rear bumper and scratches all over the passenger door from a dog, but nothing major. No rust that I could see apart from a teeny weeny bit in the door shut on the nearside rear. Once I'd driven the car and had a good look round, I decided to make an offer. So here she is; 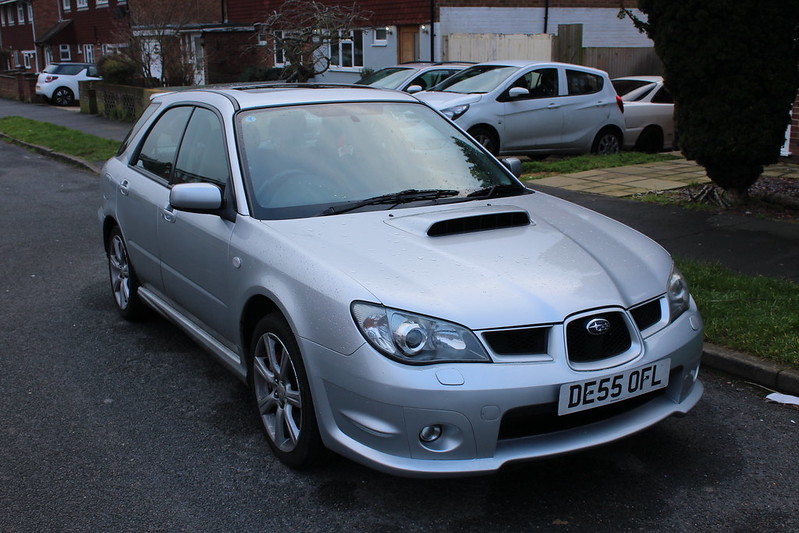 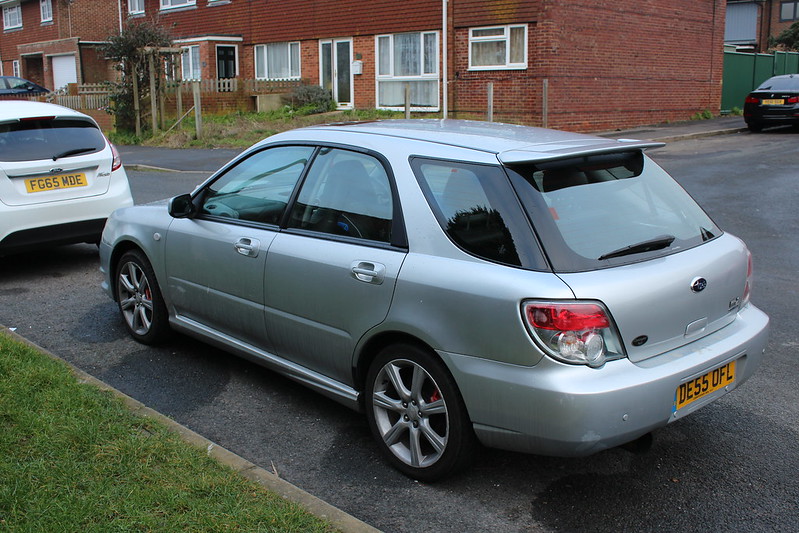  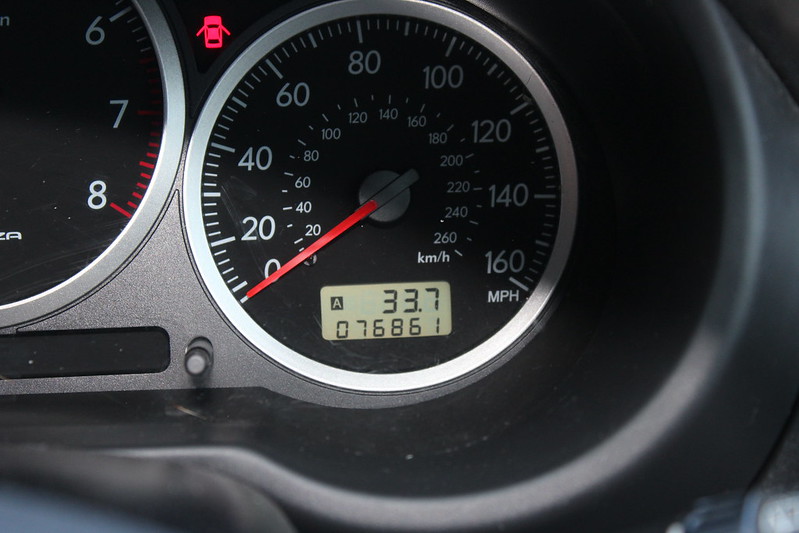 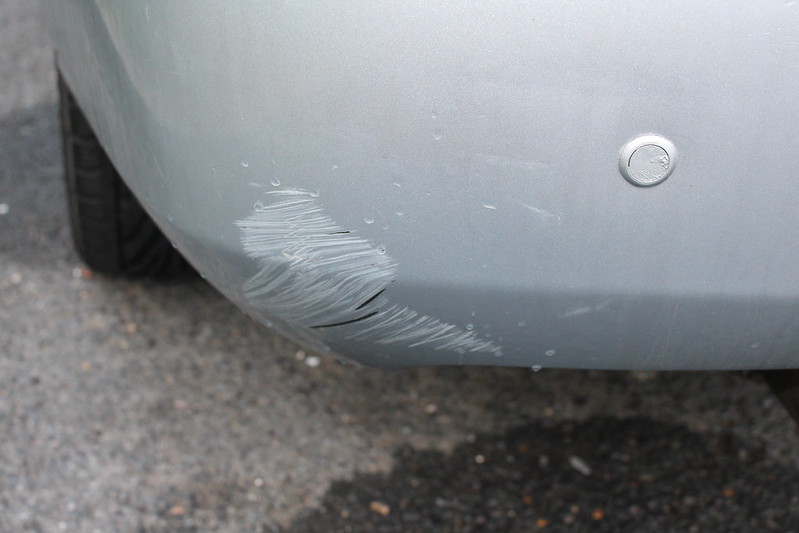  The car came with a custom made exhaust, with some sort of cheap carbon fibre can. It was okay. The previous owner had also had her up on Surrey Rolling Road, with a printout for a healthy 261.7 WHP. This car seems to have reboosted my love for the modified car scene, I have been away from it for a while! In any case, my ideas for the near future: (No Particular Order) Interior The Usual Gauges - Oil Temp, Pressure and Boost. Short Shifter OEM WRX Gear Knob New Carpets And Mats Redress The Tired Leather Interior Exterior 17" Rota Grid Alloy Wheels, Green or Black Coilovers, Lowered 20mm Over Standard. Drilled And Grooved Brake Discs Carbon Front Lip Carbon Side Skirts Carbon Wing Mirrors Debadged Rear Tailgate Tinted Rear Windows Engine Afterburner Raptor Stainless Back Box Full Afterburner Stainless Exhaust With Sports Cat (Downpipe to Back Box) Forge Dump Valve Various Engine Dress Up Items Carbon Radiator Cooling Plate Blue Silicone Hoses This list is non-exhaustive, as I will probably find more ideas/change my mind on a few bits! Last edited by IBenjieI; 19-01-2018 at 04:28 PM. 
|
|
#2
18-01-2018, 04:49 PM
|
||||
|
||||
|
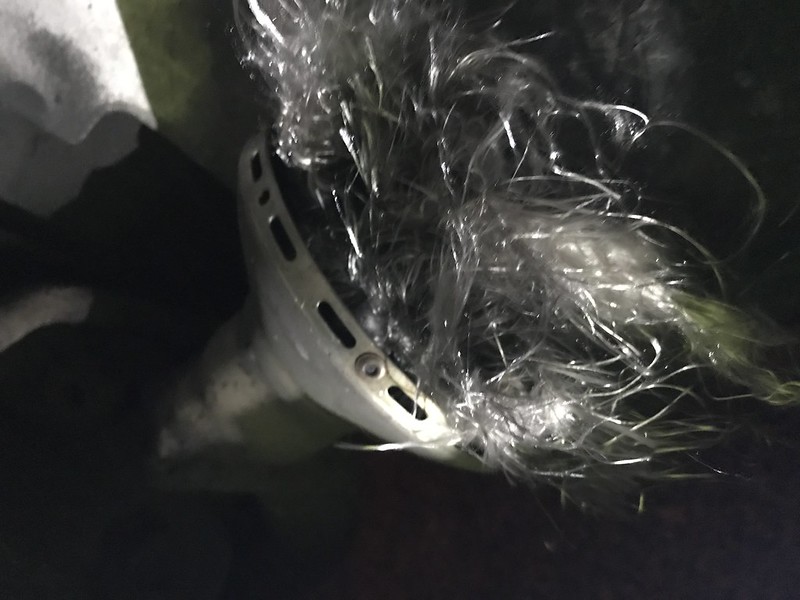
So after taking her for a good spin the other day I started to notice a really loud 'Whooshing' sound every time I accelerated and the turbo spooled up, on investigation I noticed the Carbon 'custom' back box had kind of exploded!
  Needless to say I needed a replacement sharpish! After a chat with my friend from work (He also drives a Scooby!) he recommended me to check out Scoobyworld and get an Afterburner. So I had a look and decided on an Afterburner Raptor; 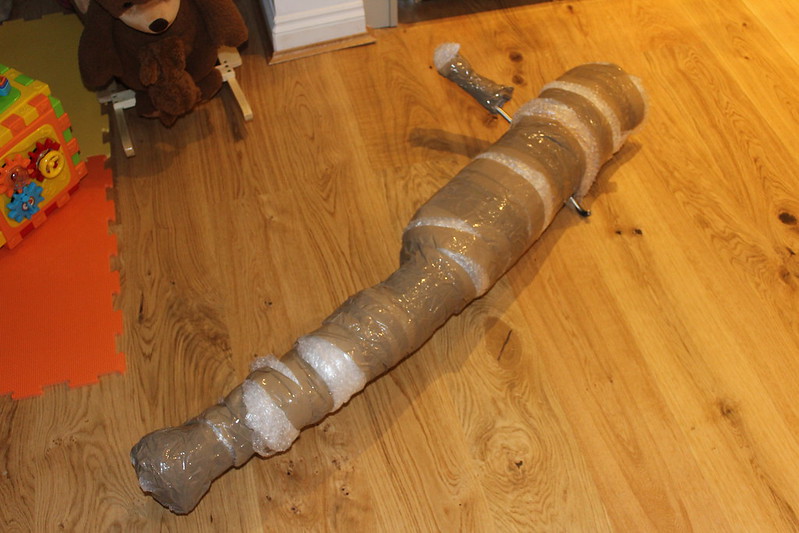 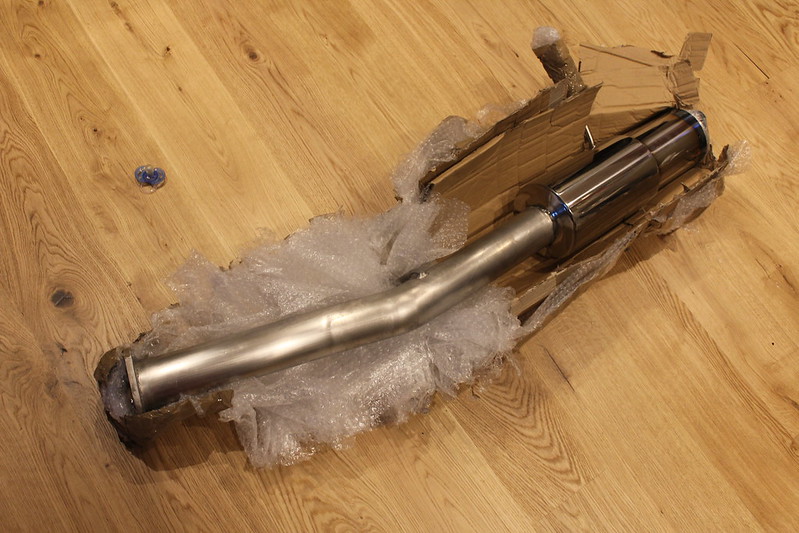 It came pretty much the next day and I couldn't wait to set about fitting it! Removing the old back box wasn't as easy as I'd hoped! I put the car up onto my ramps and crawled underneath. One of the bolts came off no problem! The other was so badly corroded, what used to be a 14mm bolt head, was more like and 11-11.5mm haha. I was having a nightmare trying to get my sockets and spanners to fit, I even tried to tighten it up to shear the bolt, I even tried a cold chisel and hammer but nothing was shifting it. So I decided to do the one thing I hated doing as it went against all my years of training as an engineer... hammer the **** out of a 10mm socket to fit the head! It worked and I was able to quickly fit the new back box. I started her up for the first time and what a sound! That classic Scooby burble with a really deep tone to her voice. I love it! Mixed with the whine from the turbo spool up, I love the sound it makes when driving the car! Now I can't wait to have the full system fitted. A picture paints a thousand words; 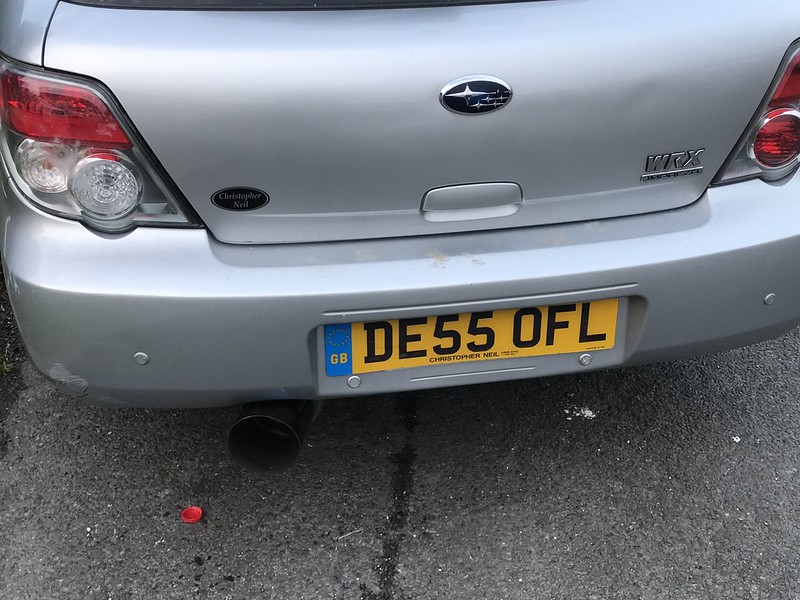 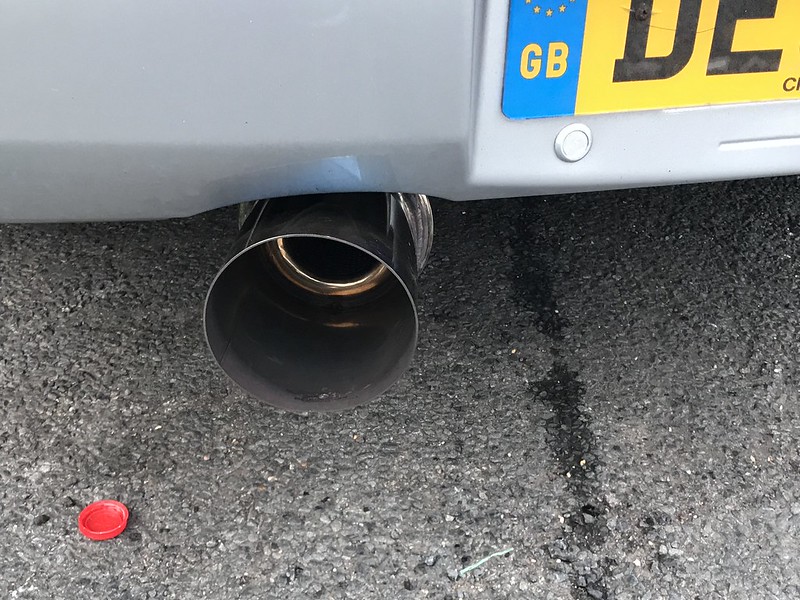 Not too loud and just the right amount of noise to be noticed. Also, a very pretty looking 5" slash cut tip! Last edited by IBenjieI; 19-01-2018 at 03:37 PM.
|
|
#3
18-01-2018, 08:08 PM
|
||||
|
||||
|
Looks nice i would go with different coilovers like Tein , Eibach , KW wouldnt waste your hard earned money on bc .
__________________
Maintained by Hypertech and Mapped by Andy Forrest 1998 UK Turbo , 1998 Terzo , 1997 JDM Type R the money pit , 2004 black WRX STI Type UK , 2004 blue FSTI
|
|
#4
18-01-2018, 08:14 PM
|
||||
|
||||
|
My FSTi was bought in contemplation of starting a family and once our eldest arrived, Mrs Stig got a Blob Wagon, so I can empathise with your approach!
Looks nice and it'll be interesting to see how it develops under your ownership! Couldn't see "tint windows" on your list... I'd recommend that.
|
|
#5
18-01-2018, 09:52 PM
|
||||
|
||||
|
Quote:
 Quote:
I'm hoping to keep regular updates, all depending on money etc however I have plans over these coming months and hope to have the wheels and coilovers sorted just after the dump valve and gauges... thanks for the like Stig!
__________________
2006 WRX Wagon Build Thread Modified and Serviced by Brent @ Southern Motor Developments in Newhaven, East Sussex.
|
|
#6
19-01-2018, 08:22 AM
|
||||
|
||||
|
Nice to see another wagon on here, mine was bought for similar reasons. I went with MeisterR coilovers and they are great.
Sent from my Swift 2 X using Tapatalk
__________________
JDM twinscroll Legacy wagon [previously blob WRX/PPP wagon, killed @ Silverstone Feb 2019]
|
|
#7
19-01-2018, 08:34 AM
|
|||
|
|||
|
we can supply a better quality TEIN c/over or Pedders lowered kit at better value and quality than the BC's.......
__________________
 ASPerformance 0191-4103770 PELTOR, PFC BRAKES, PAGID MOTUL, FERODO, SPEEDLINE, TRS, MINTEX, PIAA, HELLA, TEIN, WHITELINE, SUPER-PRO, MILLERS OILS online shop!!
|
|
#8
19-01-2018, 08:39 AM
|
||||
|
||||
|
By the way, since yours is on a 55 plate is it the 2.0 or 2.5 engine?
Sent from my Swift 2 X using Tapatalk
__________________
JDM twinscroll Legacy wagon [previously blob WRX/PPP wagon, killed @ Silverstone Feb 2019]
|
|
#9
19-01-2018, 01:06 PM
|
||||
|
||||
|
Quote:
I had MeisterR on my old Honda Civic, fantastic coilovers! The only downside is the cost... 
__________________
2006 WRX Wagon Build Thread Modified and Serviced by Brent @ Southern Motor Developments in Newhaven, East Sussex.
|
|
#10
19-01-2018, 01:06 PM
|
||||
|
||||
|
Quote:
EJ25 engine
__________________
2006 WRX Wagon Build Thread Modified and Serviced by Brent @ Southern Motor Developments in Newhaven, East Sussex.
|
|
#11
19-01-2018, 02:18 PM
|
||||
|
||||
|
Quote:
Shane
|
|
#12
19-01-2018, 02:29 PM
|
||||
|
||||
|
Coilovers covers what ever you buy! They work perfect !!!
Keeps it all mint , I'd never run coils without them again
|
|
#13
19-01-2018, 02:30 PM
|
||||
|
||||
|
Dump valves
|
|
#14
19-01-2018, 03:15 PM
|
||||
|
||||
|
Haha, people not a fan of dump valves then?
__________________
2006 WRX Wagon Build Thread Modified and Serviced by Brent @ Southern Motor Developments in Newhaven, East Sussex.
|
|
#15
19-01-2018, 03:45 PM
|
||||
|
||||
|
Quote:
Quote:
__________________
2006 WRX Wagon Build Thread Modified and Serviced by Brent @ Southern Motor Developments in Newhaven, East Sussex. Last edited by IBenjieI; 19-01-2018 at 03:48 PM.
|
|
#16
22-01-2018, 10:02 PM
|
||||
|
||||
|
Update time, bling for the engine bay and the ears!
Don't judge me, I like the noise and it's my first turbo car, let me have my 5 minutes haha   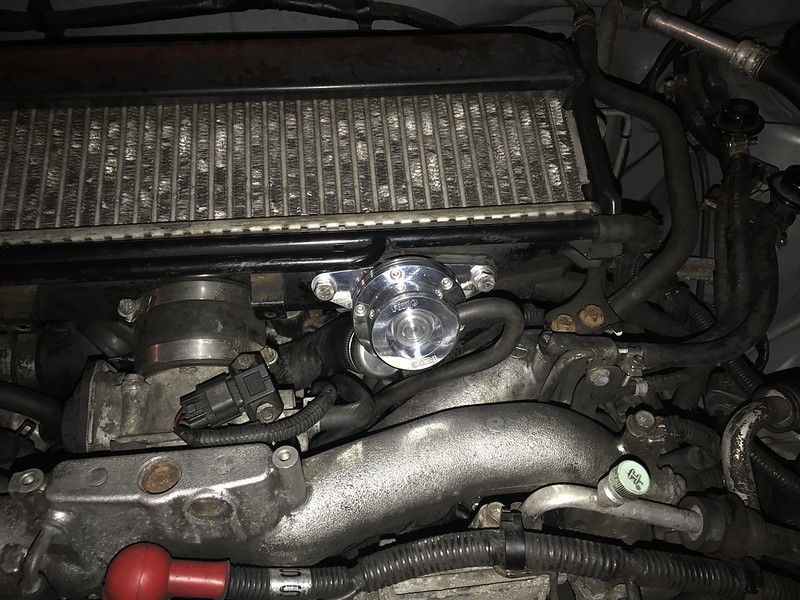 Fitted in around 20 minutes as the recirc pipe was rather difficult to remove, easy to fit the new one. Jubilee clip on the bung and managed to pinch a couple of stainless bolts and spring washers from work as didn't want to put discoloured bolts back onto a shiny new thing! Quick test run, everything feels good as far as I can tell and sounds awesome! I still have the old recirc valve so at any time something feels wrong, it goes back on!
__________________
2006 WRX Wagon Build Thread Modified and Serviced by Brent @ Southern Motor Developments in Newhaven, East Sussex.
|
|
#17
23-01-2018, 07:00 AM
|
||||
|
||||
|
Shiny...
__________________
Subaru Impreza WRX STi Prodrive Type UK 2002:  "Tinkered With!" Maintained and Modified by Super Jules  & RM Performance http://www.rmperformance.co.uk
|
|
#18
23-01-2018, 08:47 AM
|
||||
|
||||
|
Quote:
Rest of the bay needs cleaning now...
__________________
2006 WRX Wagon Build Thread Modified and Serviced by Brent @ Southern Motor Developments in Newhaven, East Sussex.
|
|
#20
23-01-2018, 01:03 PM
|
||||
|
||||
|
Quote:
__________________
2006 WRX Wagon Build Thread Modified and Serviced by Brent @ Southern Motor Developments in Newhaven, East Sussex.
|
|
#21
23-01-2018, 01:07 PM
|
||||
|
||||
|
Quote:
__________________
Not built for the Twisty's
|
|
#22
23-01-2018, 04:13 PM
|
||||
|
||||
|
Quote:
__________________
2006 WRX Wagon Build Thread Modified and Serviced by Brent @ Southern Motor Developments in Newhaven, East Sussex.
|
|
#23
24-01-2018, 04:27 PM
|
||||
|
||||
|
More shiny bits ordered from Scoobyworld!
Blue Mishimoto Radiator Stays. Blue Scoobyworld Intercooler/Throttle Body Silicone Hose. Prosport Triple 52mm Gauge Pack: Oil Temp, Oil Pressure & Boost. Should be here tomorrow
__________________
2006 WRX Wagon Build Thread Modified and Serviced by Brent @ Southern Motor Developments in Newhaven, East Sussex.
|
|
#24
24-01-2018, 04:35 PM
|
||||
|
||||
|
__________________
Subaru Impreza WRX STi Prodrive Type UK 2002: "Tinkered With!" Maintained and Modified by Super Jules & RM Performance http://www.rmperformance.co.uk
|
|
#25
24-01-2018, 04:51 PM
|
||||
|
||||
|
Quote:
__________________
2006 WRX Wagon Build Thread Modified and Serviced by Brent @ Southern Motor Developments in Newhaven, East Sussex.
|
|
#26
27-01-2018, 05:37 PM
|
||||
|
||||
|
Some more shiny's arrived today...
 Scoobyworld 52mm Gauge Pod Prosport Boost Gauge Prosport Oil Temp Gauge Prosport Oil Pressure Gauge Mishimoto Radiator Stays Oil Pressure/Temp Fitting Kit Scoobyworld Intercooler To Throttle Body Blue Silicone Hose Hoping to get around to fitting these tomorrow. Question is for the radiator stays, do I stick with the Black Anodised bolts provided or go stainless M8 bolts? Also, I'll get a raise of hands for the Scoobyworld gauge pod or an ATI pod I got from SamSTI off these forums...? 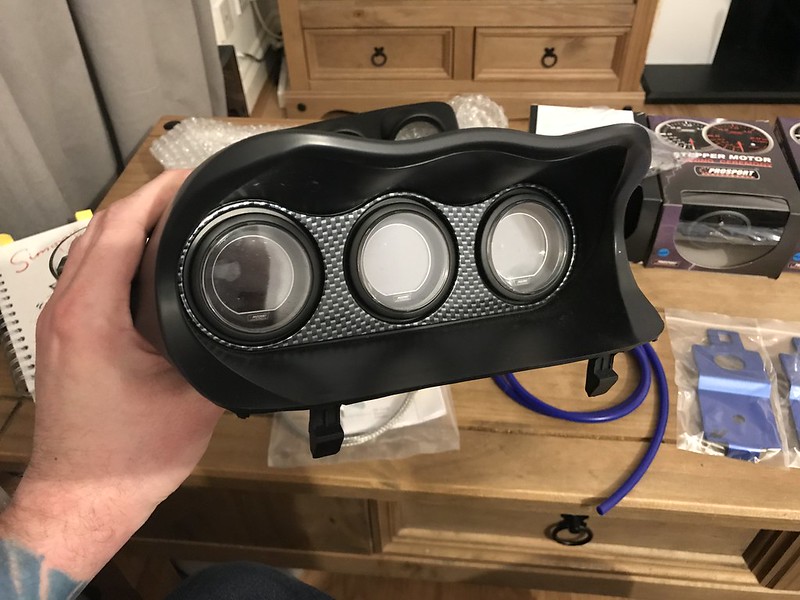 Looking forward to some feedback!
__________________
2006 WRX Wagon Build Thread Modified and Serviced by Brent @ Southern Motor Developments in Newhaven, East Sussex. Last edited by IBenjieI; 27-01-2018 at 06:03 PM.
|
|
#27
27-01-2018, 09:29 PM
|
||||
|
||||
|
ATI pod
__________________
Subaru Impreza WRX STi Prodrive Type UK 2002: "Tinkered With!" Maintained and Modified by Super Jules & RM Performance http://www.rmperformance.co.uk
|
|
#28
28-01-2018, 12:17 AM
|
||||
|
||||
|
Quote:
__________________
2006 WRX Wagon Build Thread Modified and Serviced by Brent @ Southern Motor Developments in Newhaven, East Sussex. Last edited by IBenjieI; 28-01-2018 at 10:12 AM.
|
|
#29
29-01-2018, 06:04 PM
|
||||
|
||||
|
Yesterday I got round to fitting a boost gauge and ATI/DEFI Gauge Pod. This will be a semi-how to;
*Disclaimer* I will not be held responsible for any mistakes that YOU make whilst carrying out my instructions, this is the way I did mine and it works. First things first, I cut into the vacuum line coming off the two o'clock position on the dump valve/recirc valve and joined them back together using the T-Piece. I then attached and routed the blue silicone vacuum hose along the clutch vacuum line and secured into position with cable ties and the already mounted hose clamps on the bulkhead/firewall. DO NOT OVER TIGHTEN THE CABLE TIES AS THIS WILL AFFECT THE PRESSURE IN THE LINE. 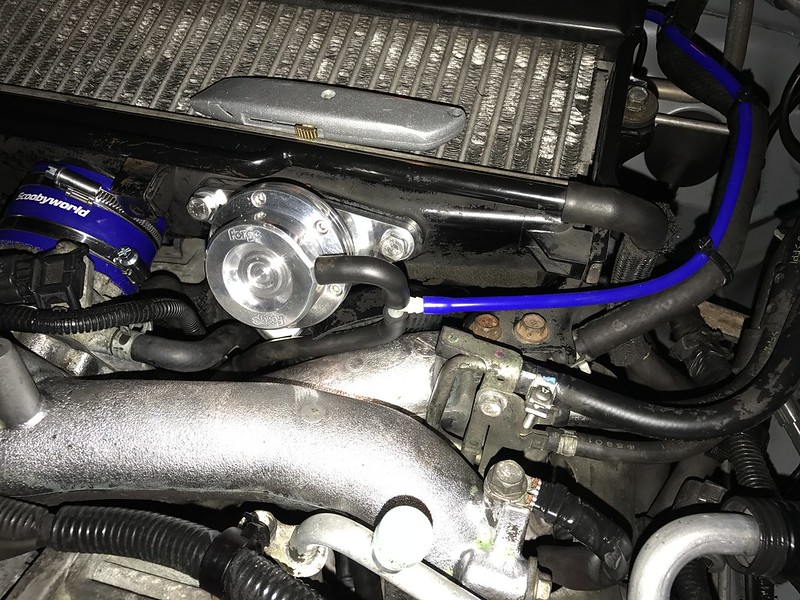 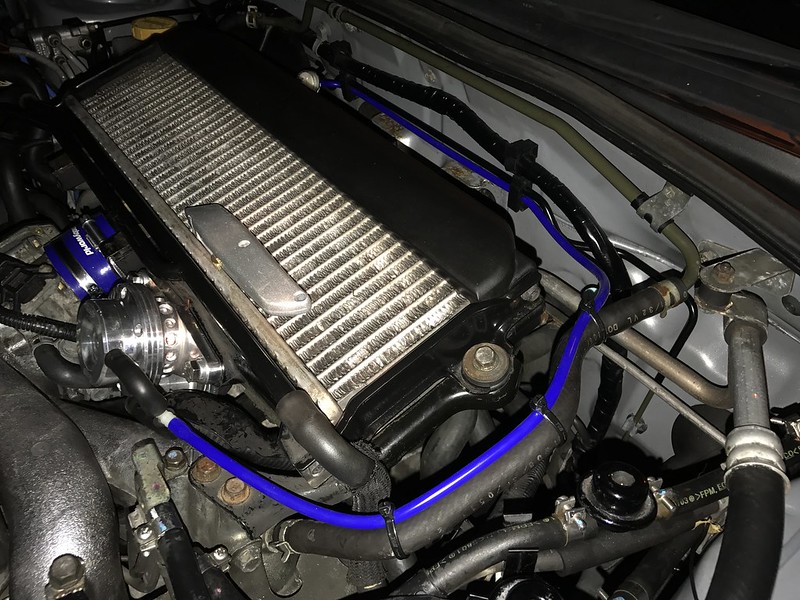 Once I'd finished routing the vacuum line I cut around 3 inches from the end and placed the inline filter that was provided with the kit, this not only smooths out pulses but it also filters out any nasty contaminants from entering the pressure sender unit. 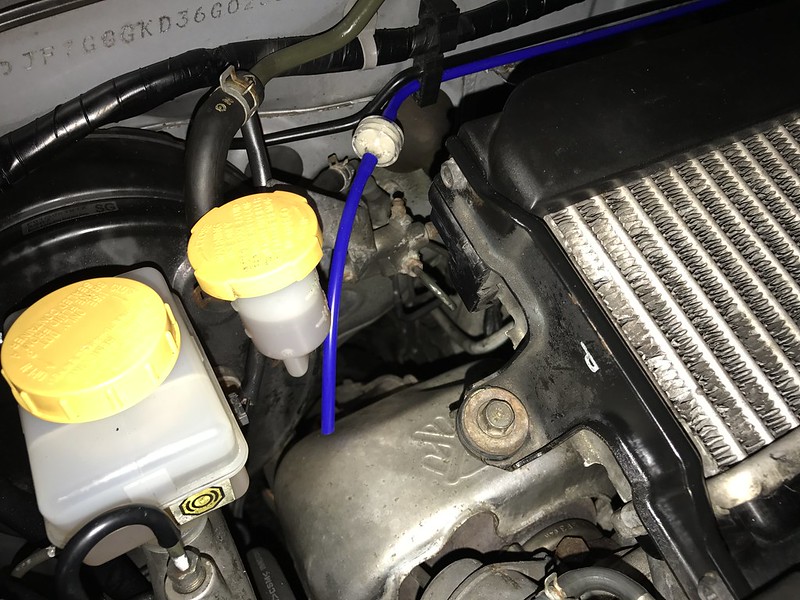 Once the filter had been fitted I removed the firewall bung just above the turbo, this comes out next to the clutch pedal. You have to remove a tiny bit of the insulation in the cabin but it is already pre-cut for you. I used my Stanley knife to cut an 'X' into the bung big enough to pass the wire and connector through then pushed it back into place in the firewall on the engine side. I then proceeded to feed the sensor wire through the hole and pulled through from within the cabin until I had enough to feed up to where the Gauge Pod sits on the dashboard.   Note in the pictures above if you follow the sensor wire down you will see where the bung is on the firewall. I also at this point mounted the sender unit on the clutch fluid bracket but I may move this at a later date due to hot exhaust gases rising around this point. Once I was finished mounting and securing everything in the engine bay I popped the plastic surround off just below the steering wheel, I was unsure how to remove it entirely so I only pulled the corner off but this gave me plenty of space to work with. I also removed the clock and surround from the top of the dashboard, this bit is easy as it is only held in with clips. You might have to use a flat bladed screwdriver to 'persuade' it from it's mount. 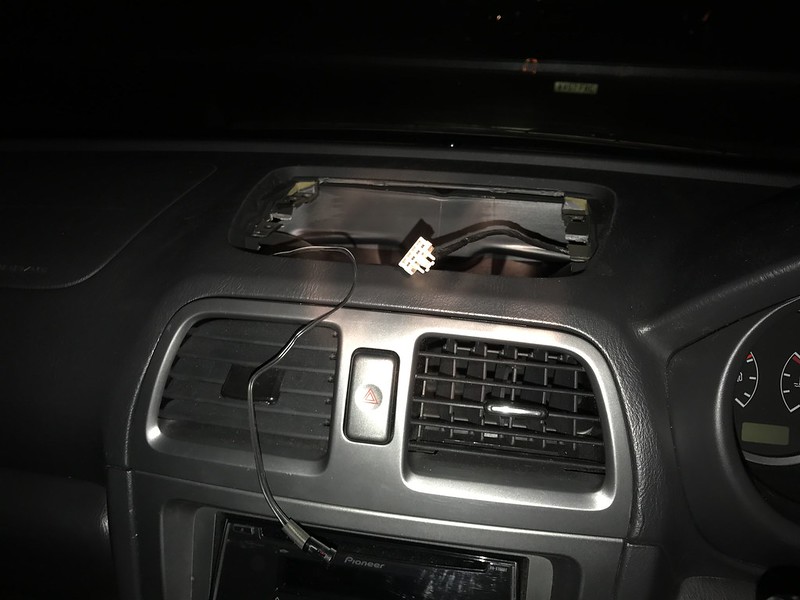 When you remove the connector from the back of the clock, take note which wires correspond to what. Its written on the underside of the clock unit so you can't really go wrong but to make things easier I cut the plug off and placed it back into it's socket for a visual aid. RED - Battery +ve BLACK - Battery -ve / Earth ORANGE - Accessory PURPLE - Lights These colours are used on my Hawkeye so I presume all new ages but don't quote me. If in doubt, look it up on the net! Now the connector was removed I stripped the ends of all the wires except the purple 'LIGHTS' wire and used a soldering iron to coat the ends in solder. I decided not to use the Purple wire as I wanted day and night modes on the gauge to be Green, therefore I needed no input from the lights. The instructions that come with your gauges will suggest what wires need to be attached to what. The instructions suggested the following for Green on both day and night modes; RED - Battery +ve BLACK - Battery -ve White - No Input Orange - Accessory After preparing the ends of the clock loom and gauge power harness with solder, I soldered them together using the above chart and used heat shrink to cover the newly made connections. I prefer to use heat shrink as it will never come off unless cut. 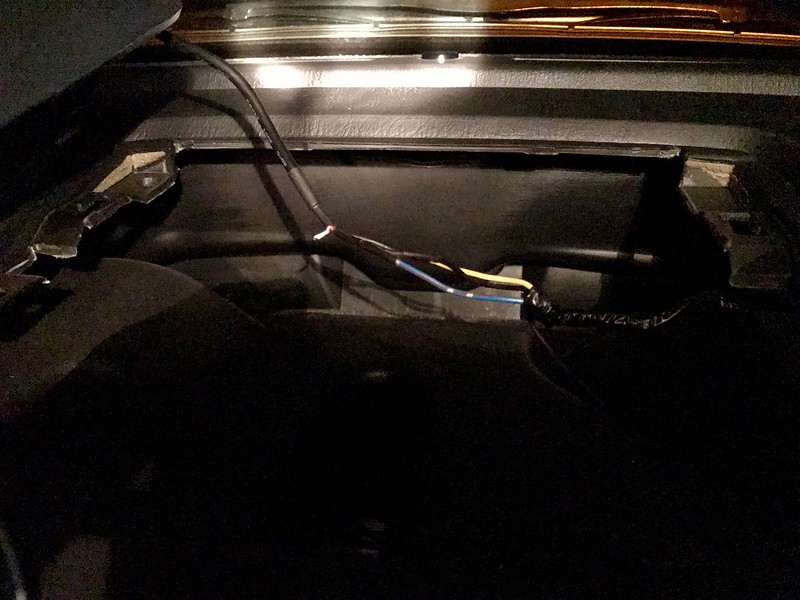 Now the power side of things was completed I pulled the sensor wire up through the dash and over the top of the heater ducting, make sure to secure this wire away from the clutch pedal as over time the clutch will chafe through this wire! I plugged the connectors in to the back of the boost gauge and turned the ignition on to check it was all working, once I was happy I pushed the pod into place and admired my handy work! 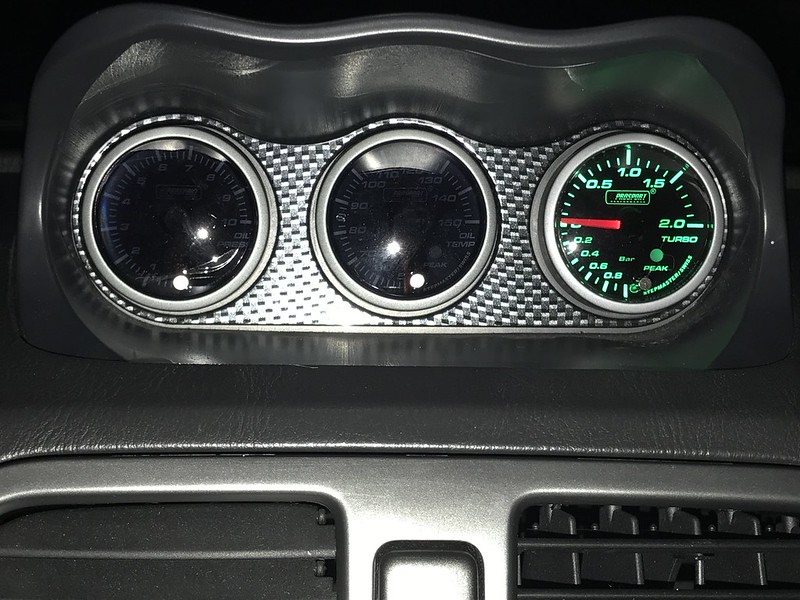 Start 'er up! 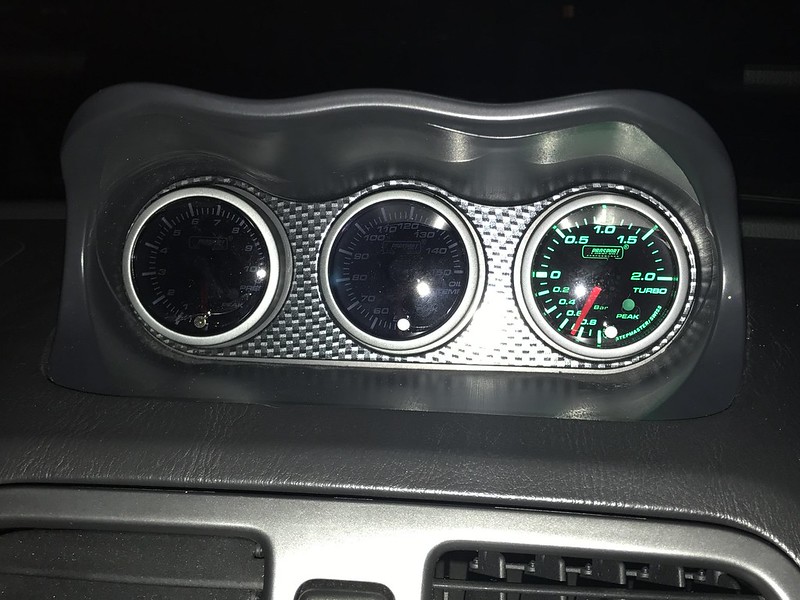 Note I haven't connected up the oil pressure/temp gauges yet as this is a little harder! All of this took me roughly 2 hours to complete, I'm a bit of a perfectionist so I secure and route wires properly etc... You're all clever enough to figure out how to do that bit!
__________________
2006 WRX Wagon Build Thread Modified and Serviced by Brent @ Southern Motor Developments in Newhaven, East Sussex. Last edited by IBenjieI; 29-01-2018 at 06:09 PM.
|
|
#30
29-01-2018, 06:06 PM
|
||||
|
||||
|
Great guide and looks good
__________________
Subaru Impreza WRX STi Prodrive Type UK 2002: "Tinkered With!" Maintained and Modified by Super Jules & RM Performance http://www.rmperformance.co.uk
|
|
#31
29-01-2018, 06:11 PM
|
||||
|
||||
|
Quote:
Can copy and paste into the DIY section for others if you like?
__________________
2006 WRX Wagon Build Thread Modified and Serviced by Brent @ Southern Motor Developments in Newhaven, East Sussex.
|
|
#32
08-02-2018, 07:55 AM
|
||||
|
||||
|
So, it turns out that black ice also affects 4WD!
Hit a patch this morning on the A27 outside Lewes... I'm gutted! 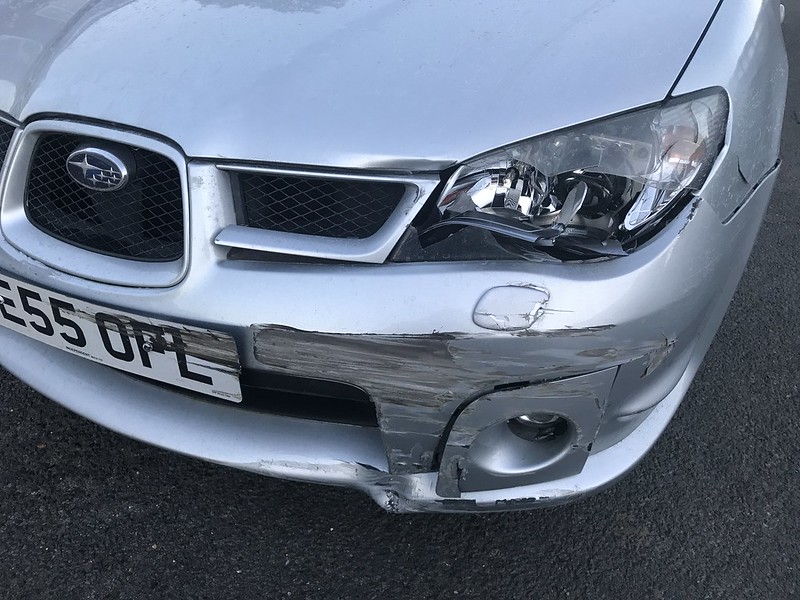 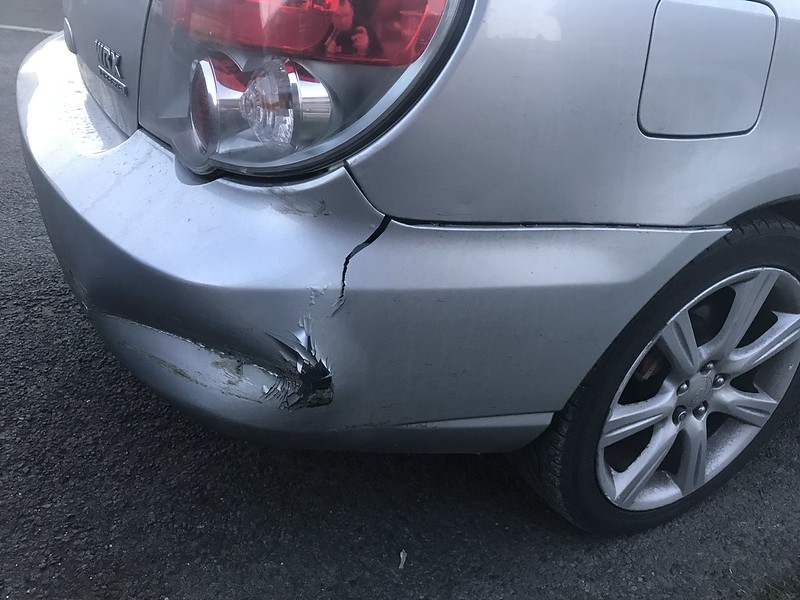 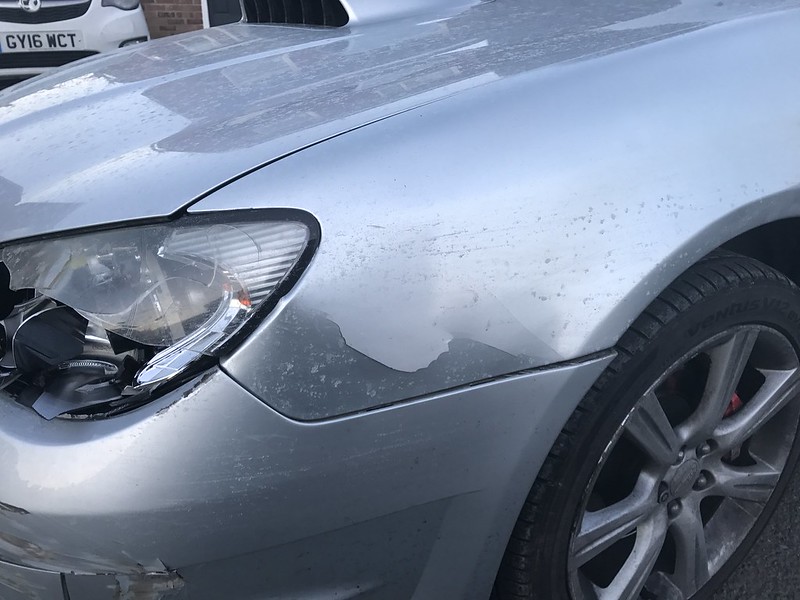 Gutted. Off to the bodyshop this morning for a quote and find out the extent of the damage.
__________________
2006 WRX Wagon Build Thread Modified and Serviced by Brent @ Southern Motor Developments in Newhaven, East Sussex.
|
|
#33
08-02-2018, 08:06 AM
|
||||
|
||||
|
What a shame, hope the bill isn't too scary, if you're not going through insurance there's plenty of breakers out there for the bumpers, light, bonnet and wing and you may even be able to pick them up in the right colour.
I contemplated taking the A27 from Hastings to Crawley this morning rather than risking the cross country route as thought it would be safer, would appear that wasn't the case.
|
|
#34
08-02-2018, 08:08 AM
|
||||
|
||||
|
Ouch!!!
__________________
Subaru Impreza WRX STi Prodrive Type UK 2002: "Tinkered With!" Maintained and Modified by Super Jules & RM Performance http://www.rmperformance.co.uk
|
|
#35
08-02-2018, 08:17 AM
|
||||
|
||||
|
Quote:
It could have been a lot worse, I think it's only cosmetic. I can't see any signs of chassis damage. I'd rather not go through the insurance as I want to keep my 6 years NCB!
__________________
2006 WRX Wagon Build Thread Modified and Serviced by Brent @ Southern Motor Developments in Newhaven, East Sussex.
|
|
#36
08-02-2018, 09:39 AM
|
||||
|
||||
|
JPP aren't the cheapest unfortunately, there's this on eBay
https://rover.ebay.com/rover/0/0/0?m...2F253379994770
|
|
#37
08-02-2018, 09:47 AM
|
||||
|
||||
|
Quote:
__________________
2006 WRX Wagon Build Thread Modified and Serviced by Brent @ Southern Motor Developments in Newhaven, East Sussex.
|
|
#38
08-02-2018, 10:03 AM
|
||||
|
||||
|
Bugger!
Good luck finding parts and getting it fixed. As crazy as it sounds, with that damage front and rear (both bumpers, bonnet, wing and headlamp) I wouldn't be surprised if an insurance company write it off. Hawkeye headlamps are expensive, plus factor in bodyshop /paint and a courtesy car into the claim and it'll push it over the threshold I reckon. Of course its repairable and you could buy it back and put on the road, but then it would be flagged as CatD (or CatN now?) i expect. Hopefully you can do a deal with a breaker for all the parts
|
|
#39
08-02-2018, 11:02 AM
|
||||
|
||||
|
Quote:
Looks like overtime is in order this year!
__________________
2006 WRX Wagon Build Thread Modified and Serviced by Brent @ Southern Motor Developments in Newhaven, East Sussex.
|
|
#40
08-02-2018, 12:30 PM
|
||||
|
||||
|
Might be worth trying JPP or MB developments, might be able to piece the parts needed together, I'd have thought there would be single Headlights on eBay, not everyone dings the same corner.
|
|
#41
08-02-2018, 01:48 PM
|
||||
|
||||
|
Quote:
__________________
Not built for the Twisty's
|
|
#42
08-02-2018, 01:52 PM
|
||||
|
||||
|
If that one at the breakers is the same colour code, then i'd jump on the £850 bundle. You'd be spending that again at a half decent bodyshop if it all needed painting...
|
|
#43
08-02-2018, 01:56 PM
|
||||
|
||||
|
Just noticed you didn't list bonnet in your post, it'd be cheaper to get that off the breaker if he has it too than get a bodyshop to work on yours.
Another consideration - save the £65 pallet delivery and go and collect, even if its a few hours away? Bodywork on a pallet can be easily damaged in transit, i'd rather load a car/van up and pad it out/protect paintwork properly.
|
|
#44
08-02-2018, 01:57 PM
|
||||
|
||||
|
Quote:
Wise words
__________________
Subaru Impreza WRX STi Prodrive Type UK 2002: "Tinkered With!" Maintained and Modified by Super Jules & RM Performance http://www.rmperformance.co.uk
|
|
#45
08-02-2018, 02:57 PM
|
||||
|
||||
|
Look at Johnson's accident repair in Burgess Hill area. He'll give you a free quote.
He's fixed a lot worse for me and my dad before, and he's very reasonable and fantastic job too. Sent from my E5823 using Tapatalk
|
|
#46
08-02-2018, 04:21 PM
|
||||
|
||||
|
Jumped on the £850 as it's all in same colour. It would probably cost more than the pallet delivery to hire a van and drive up there so that's sorted now. As for the bonnet, that's getting straightened out by a guy my next door neighbour knows, he owns a body shop. This has been an expensive and **** day!
__________________
2006 WRX Wagon Build Thread Modified and Serviced by Brent @ Southern Motor Developments in Newhaven, East Sussex.
|
|
#48
08-02-2018, 05:16 PM
|
||||
|
||||
|
Quote:
__________________
2006 WRX Wagon Build Thread Modified and Serviced by Brent @ Southern Motor Developments in Newhaven, East Sussex.
|
|
#49
08-02-2018, 05:38 PM
|
||||
|
||||
|
Such a shame, especially when it comes out of the blue on an icy morning. I hope you get everything fixed up easily and as pain free as possible.
|
|
#50
08-02-2018, 07:46 PM
|
||||
|
||||
|
Quote:
__________________
2006 WRX Wagon Build Thread Modified and Serviced by Brent @ Southern Motor Developments in Newhaven, East Sussex.
|
|
#51
08-02-2018, 07:59 PM
|
||||
|
||||
|
Quote:
Sent from my E5823 using Tapatalk
|
|
#52
08-02-2018, 09:50 PM
|
||||
|
||||
|
Quote:
__________________
2006 WRX Wagon Build Thread Modified and Serviced by Brent @ Southern Motor Developments in Newhaven, East Sussex.
|
|
#53
09-02-2018, 05:16 PM
|
||||
|
||||
|
Hard luck, glad you have found bits already. I keep missing out on bits in the correct colour for my wagon (not a Hawk, so we're not competing at least!)
__________________
JDM twinscroll Legacy wagon [previously blob WRX/PPP wagon, killed @ Silverstone Feb 2019]
|
|
#54
10-02-2018, 09:43 AM
|
||||
|
||||
|
Quote:
__________________
2006 WRX Wagon Build Thread Modified and Serviced by Brent @ Southern Motor Developments in Newhaven, East Sussex.
|
|
#55
14-02-2018, 11:53 AM
|
||||
|
||||
|
Little bit of an update on the repair, the body panels arrived yesterday.
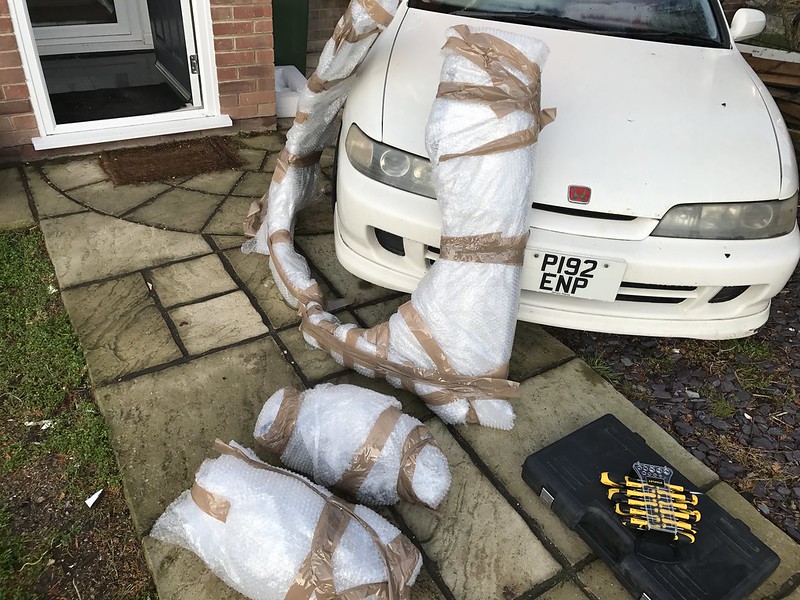 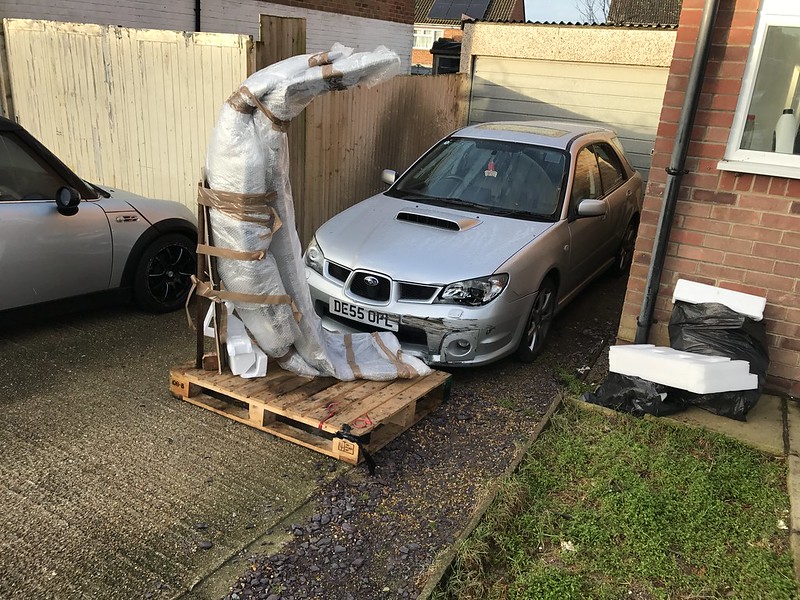 They're not quite the right colour, I think they're more grey than silver. However the body shop that is going to repair the bonnet will pick them up tomorrow and prep them for a spray. Also a bit of a Brucey bonus... the new front bumper came with Zunsport grilles on the top and bottom! Winner.
__________________
2006 WRX Wagon Build Thread Modified and Serviced by Brent @ Southern Motor Developments in Newhaven, East Sussex.
|
|
#56
14-02-2018, 12:01 PM
|
||||
|
||||
|
Result indeed
__________________
Subaru Impreza WRX STi Prodrive Type UK 2002: "Tinkered With!" Maintained and Modified by Super Jules & RM Performance http://www.rmperformance.co.uk
|
|
#57
14-02-2018, 12:03 PM
|
||||
|
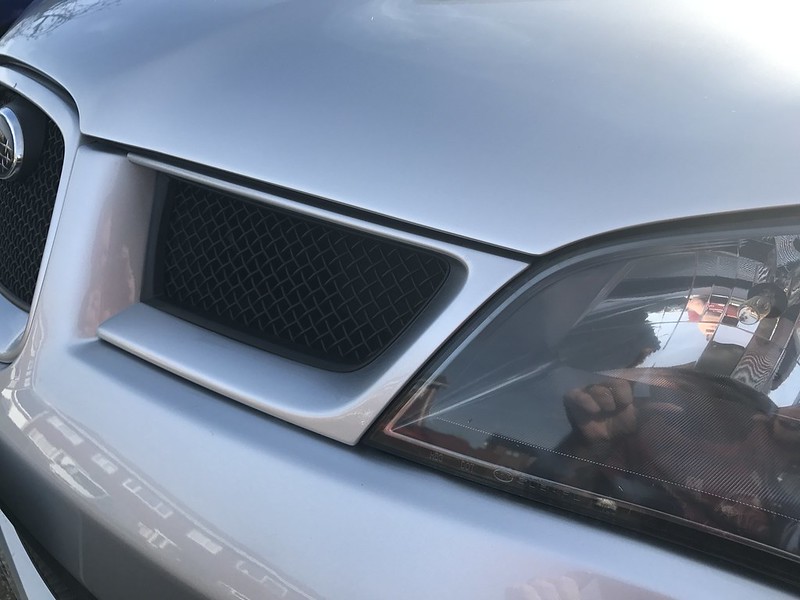
||||
|
Quote:
__________________
2006 WRX Wagon Build Thread Modified and Serviced by Brent @ Southern Motor Developments in Newhaven, East Sussex.
|
|
#58
14-02-2018, 01:57 PM
|
||||
|
||||
|
Result but the DC2 tho????
|
|
#59
14-02-2018, 10:00 PM
|
||||
|
||||
|
Quote:
__________________
2006 WRX Wagon Build Thread Modified and Serviced by Brent @ Southern Motor Developments in Newhaven, East Sussex.
|
|
#60
15-02-2018, 09:58 PM
|
||||
|
||||
|
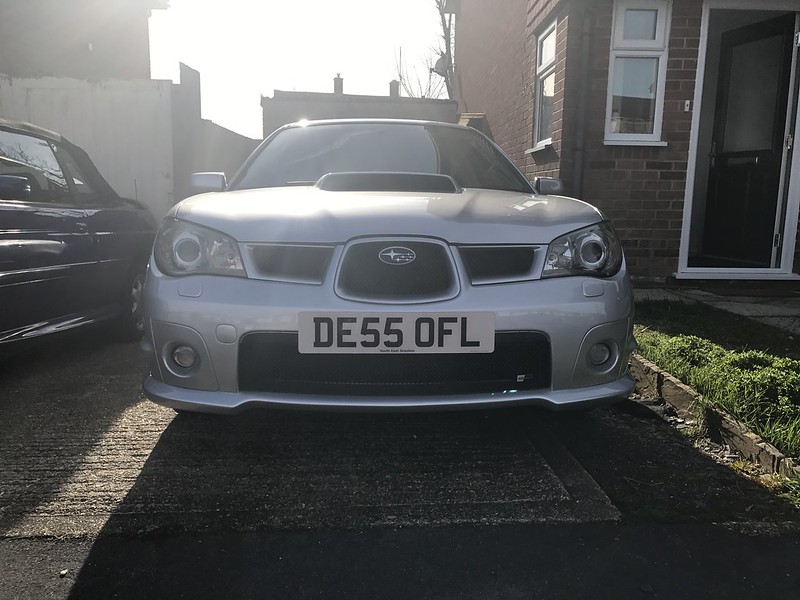
So today saw the replacement panels being taken to the bodyshop for a prep and spray up, the car will go sometime next week.
New number plates arrived today... with a little bling 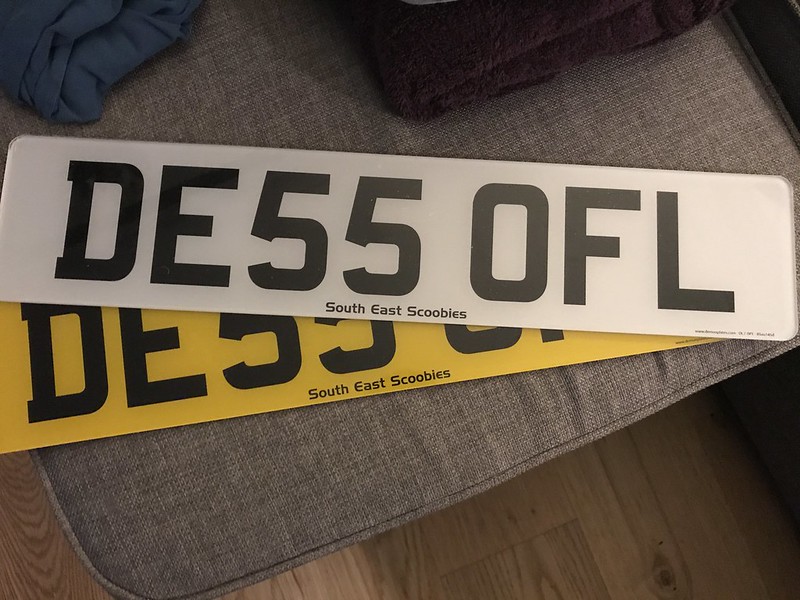
__________________
2006 WRX Wagon Build Thread Modified and Serviced by Brent @ Southern Motor Developments in Newhaven, East Sussex.
|
|
#62
15-02-2018, 10:14 PM
|
||||
|
||||
|
Quote:
__________________
2006 WRX Wagon Build Thread Modified and Serviced by Brent @ Southern Motor Developments in Newhaven, East Sussex.
|
|
#63
16-02-2018, 06:00 AM
|
||||
|
||||
|
Nice touch
__________________
Subaru Impreza WRX STi Prodrive Type UK 2002: "Tinkered With!" Maintained and Modified by Super Jules & RM Performance http://www.rmperformance.co.uk
|
|
#64
16-02-2018, 08:33 AM
|
||||
|
||||
|
Quote:
__________________
2006 WRX Wagon Build Thread Modified and Serviced by Brent @ Southern Motor Developments in Newhaven, East Sussex.
|
|
#66
17-02-2018, 02:43 PM
|
||||
|
||||
|
Quote:
__________________
2006 WRX Wagon Build Thread Modified and Serviced by Brent @ Southern Motor Developments in Newhaven, East Sussex.
|
|
#67
05-04-2018, 05:29 PM
|
||||
|
||||
|
Good evening folks! Finally after months of waiting, the Scoob lives and drives once again! Picked her up this evening, cost a pretty penny but Barry has done an incredible job getting her back to standard. Even threw in some new parking sensors for free because he took longer than he'd hoped! I'll let the pictures do the talking...
 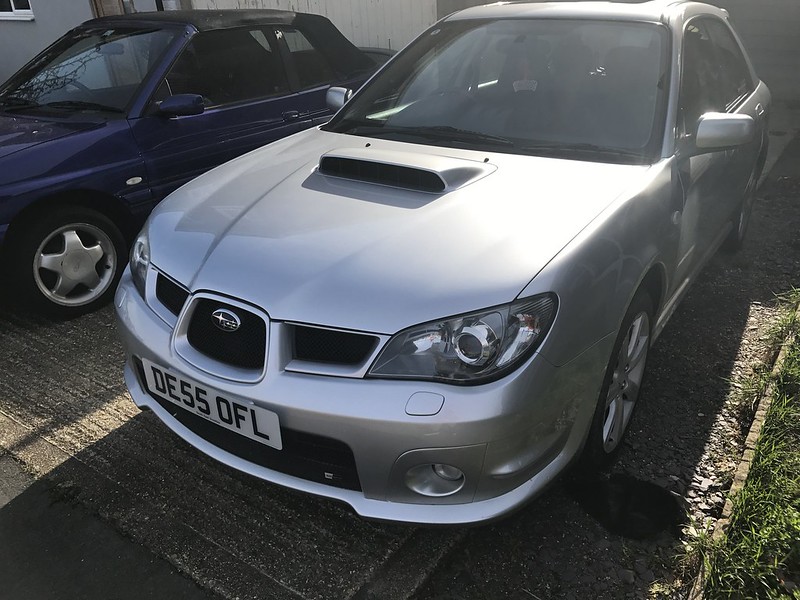 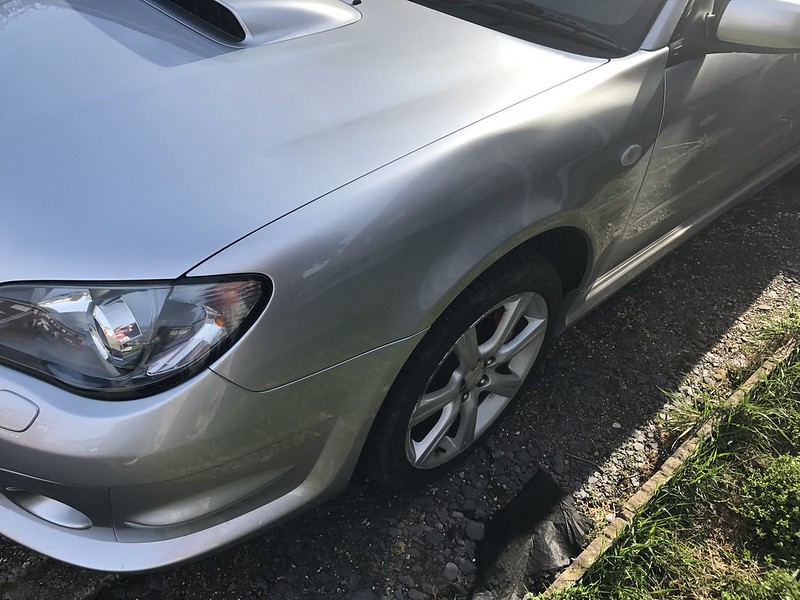   The bumpers, wing and headlight were second hand but the bonnet is original, Barry managed to do a fantastic job getting the crease out of the bonnet and removing so many dents from previous push-closes. Refer to the crash pics on page 1 for a comparison! I really didn't think it would ever look this good again but here we are! The Zunsport grille really makes the front end, just need a splitter now to finish her off nicely! One happy boy. I think next on the cards is having the tailgate resprayed and debadged, will completely change the look of the rear end.
__________________
2006 WRX Wagon Build Thread Modified and Serviced by Brent @ Southern Motor Developments in Newhaven, East Sussex. Last edited by IBenjieI; 05-04-2018 at 05:41 PM.
|
|
#68
05-04-2018, 05:38 PM
|
||||
|
||||
|
Quote:
Great job done there
__________________
Subaru Impreza WRX STi Prodrive Type UK 2002: "Tinkered With!" Maintained and Modified by Super Jules & RM Performance http://www.rmperformance.co.uk
|
|
#69
05-04-2018, 05:54 PM
|
||||
|
||||
|
Quote:
__________________
2006 WRX Wagon Build Thread Modified and Serviced by Brent @ Southern Motor Developments in Newhaven, East Sussex.
|
|
#70
05-04-2018, 07:14 PM
|
||||
|
||||
|
So glad you are back up and running after what must have been a pretty pants few months. Car is looking right back up to scratch.
|
|
#71
05-04-2018, 08:05 PM
|
||||
|
||||
|
Quote:
__________________
2006 WRX Wagon Build Thread Modified and Serviced by Brent @ Southern Motor Developments in Newhaven, East Sussex.
|
|
#72
16-01-2019, 11:06 AM
|
||||
|
||||
|
Update time!
It's been a very crap 2018 for me going through a divorce, working non stop etc so now I'm free of the wife's tyranny it's time to spend some money on the Scoob! Myself and SamSTI on this forum have known each other since school and he offered to sell me an Afterburner De-cat downpipe and middle pipe for a bargain! 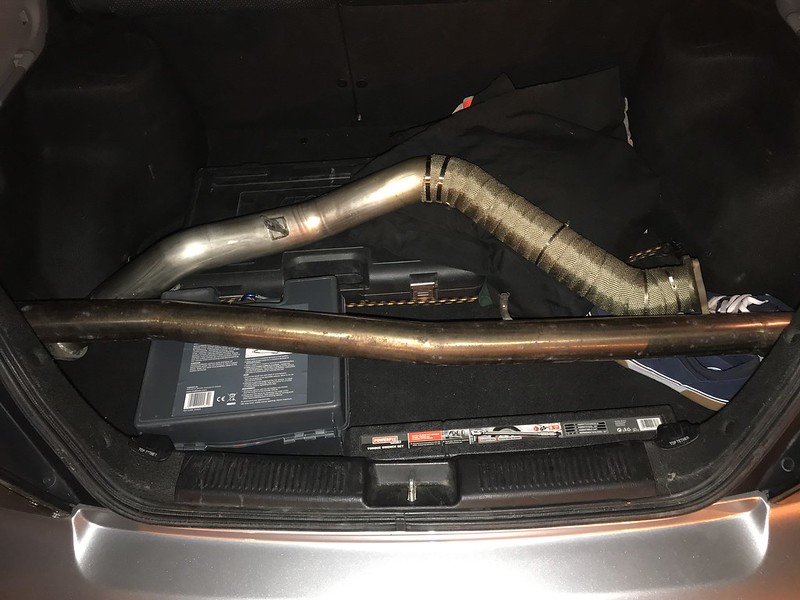 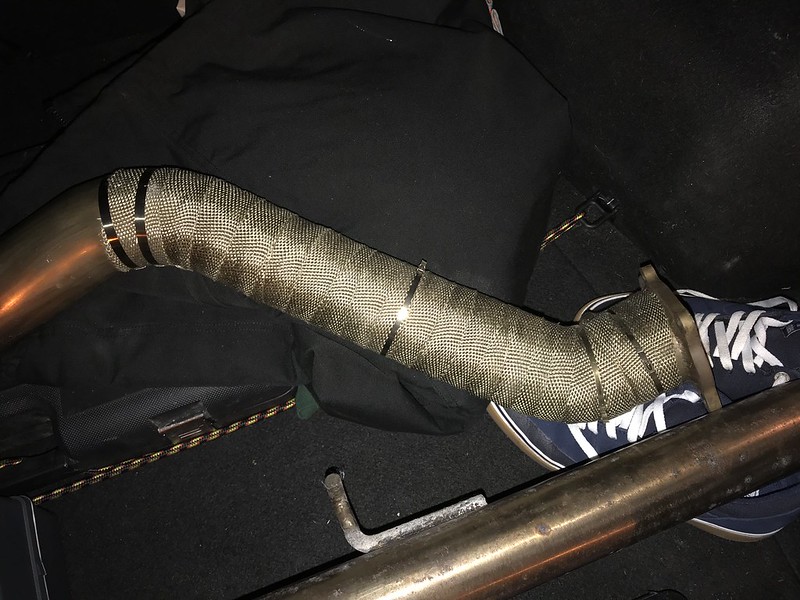 As you can see, they are IMMACULATE. The downpipe was only fitted to Sam's car for a few hundred miles and he took it off because it was too loud for a track day. On top of that I bought myself a Walbro 255lph fuel pump from Scoobyworld.  The car is booked into SMD in Newhaven on the 5th February to have the above fitted, also fitting some Tein lowering springs whilst she's there. On the 7th the car is booked in with Duncan Graham and Surrey Rolling Road for a remap, I'm so excited! 
__________________
2006 WRX Wagon Build Thread Modified and Serviced by Brent @ Southern Motor Developments in Newhaven, East Sussex. Last edited by IBenjieI; 16-01-2019 at 12:11 PM.
|
|
#73
16-01-2019, 11:09 AM
|
||||
|
||||
|
Glad things are improving for you mate and cant wait to see the finished result
__________________
Subaru Impreza WRX STi Prodrive Type UK 2002: "Tinkered With!" Maintained and Modified by Super Jules & RM Performance http://www.rmperformance.co.uk
|
|
#74
16-01-2019, 11:18 AM
|
||||
|
||||
|
Quote:
As for the lowering springs, I saw a really nice Black Blob WRX in Halfrauds the other day sitting on a set and it looked sexy as fook. That swayed me. Now all I need is a lovely brand new set of 17's and she's looking good. Not sure whether I want Rota or Prodrive...
__________________
2006 WRX Wagon Build Thread Modified and Serviced by Brent @ Southern Motor Developments in Newhaven, East Sussex.
|
|
#75
16-01-2019, 04:22 PM
|
||||
|
||||
|
I only went into Halfords for some wheel cleaner!
 Spot the difference... 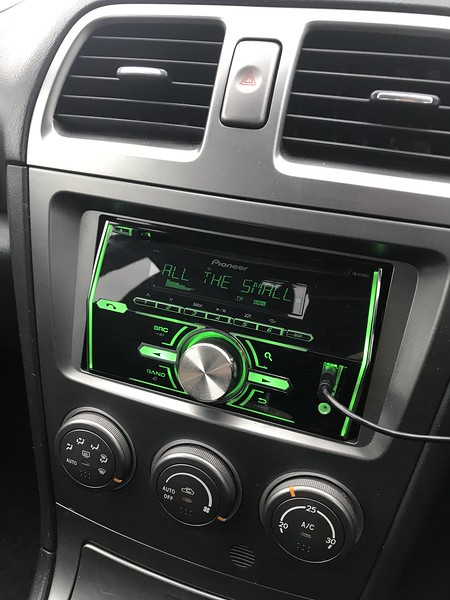  Much better
__________________
2006 WRX Wagon Build Thread Modified and Serviced by Brent @ Southern Motor Developments in Newhaven, East Sussex. Last edited by IBenjieI; 16-01-2019 at 04:27 PM.
|
|
#76
16-01-2019, 04:29 PM
|
||||
|
||||
|
Also, forgot about the interior bits I bought a few weeks back to tidy up the center console...
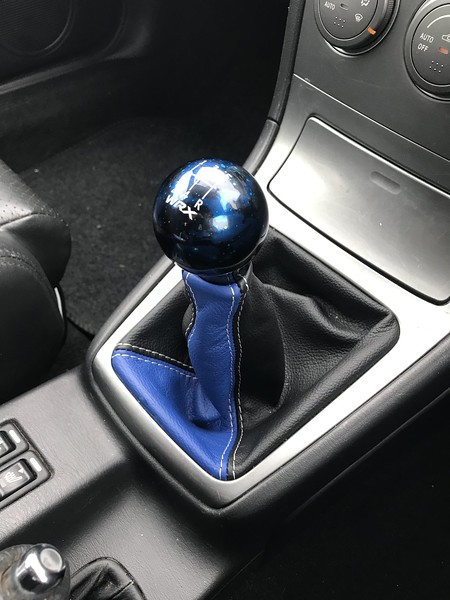 WRX gearknob from Scoobyworld and an unbranded leather gaiter from our good old friendly marketplace, eBay. I have some 4D carbon effect vinyl wrap ready to cover the silver bits and pieces, that will be sorted out when time allows.
__________________
2006 WRX Wagon Build Thread Modified and Serviced by Brent @ Southern Motor Developments in Newhaven, East Sussex.
|
|
#77
16-01-2019, 04:31 PM
|
||||
|
||||
|
Snazzy
__________________
Subaru Impreza WRX STi Prodrive Type UK 2002: "Tinkered With!" Maintained and Modified by Super Jules & RM Performance http://www.rmperformance.co.uk
|
|
#78
16-01-2019, 04:40 PM
|
||||
|
||||
|
Quote:
__________________
2006 WRX Wagon Build Thread Modified and Serviced by Brent @ Southern Motor Developments in Newhaven, East Sussex.
|
|
#79
16-01-2019, 10:42 PM
|
||||
|
||||
|
Ok, so I had a little time this evening once the little boy went to sleep so I decided to try my hand at vinyl wrapping the centre console fascias. This is the first time I've ever tried anything like this, took me about an hour altogether.
I took the gearknob surround plastic out of the car very easily, it literally just pops out. Popped out the clips holding the gaiter leather in place and it was free to come out the car...  I bought some 4D carbon effect wrap a little while ago on eBay, kept putting this off but I watched a few videos on YouTube on how to do this... it's actually quite simple. I cut the wrap to size probably a good few inches larger than I actually needed to give me some wiggle room. 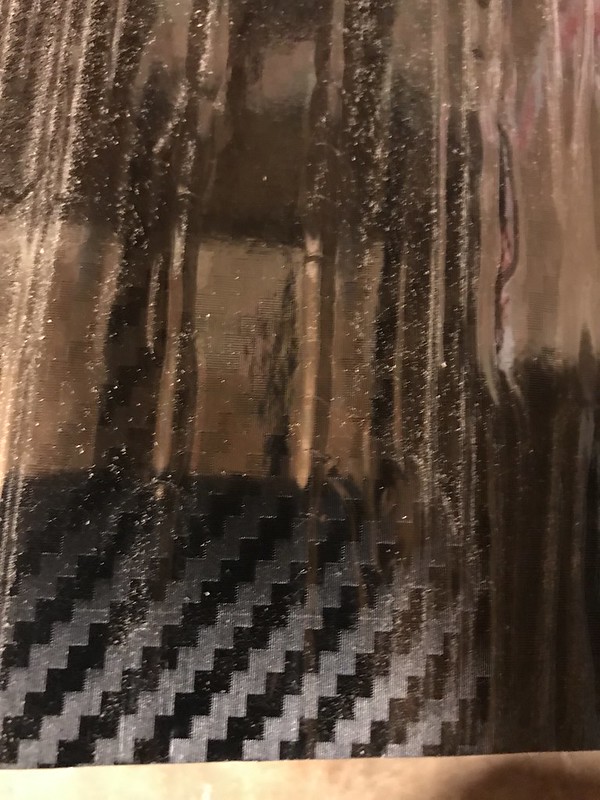  I started off by removing the protective film on the front of the wrap, removed the backing paper and carefully followed the main contour of the plastic. Once it was in place I started gently heating it with a heat gun, on a low setting so I didn't overheat/damage the wrap or plastic. It only needed about a second or so and you can start to see it taking shape, using the squeegee supplied I dragged the bubbles out whilst it was still warm. 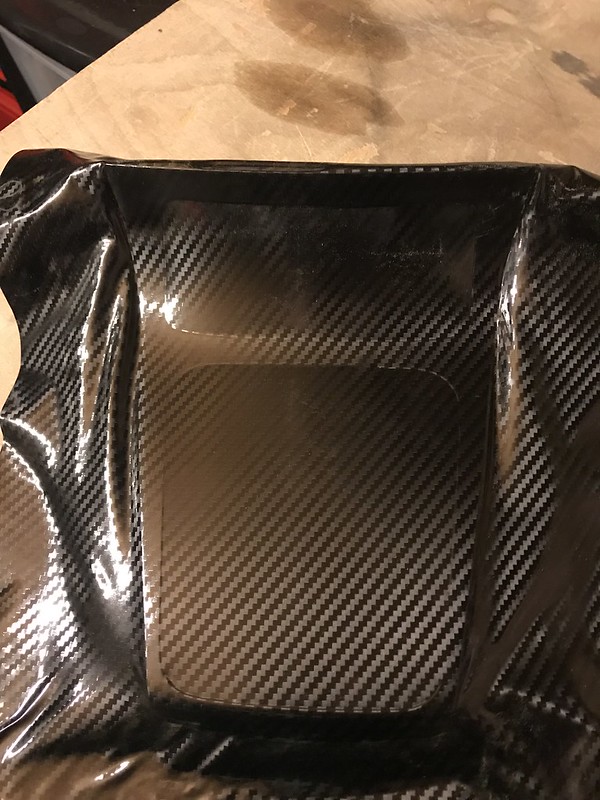  Continued heating it for a second, stretching it around the plastic and squeegeeing the bubbles out. Once the wrap cools, it semi hardens and feels like it's almost vacuum formed. Once enough was around the edges and smoothed out as much as I could I trimmed it, I figured once the plastic was back in place it would hold the wrap in position on the underneaths so I wasn't really too fussed about it. I cut a big 'X' into the void spaces for the gearknob and the ashtray and did the same as before. Using a sharp stanley knife I 'traced' the outline of the plastic to trim off the excess wrap. Put the ashtray back in and admired my handiwork! 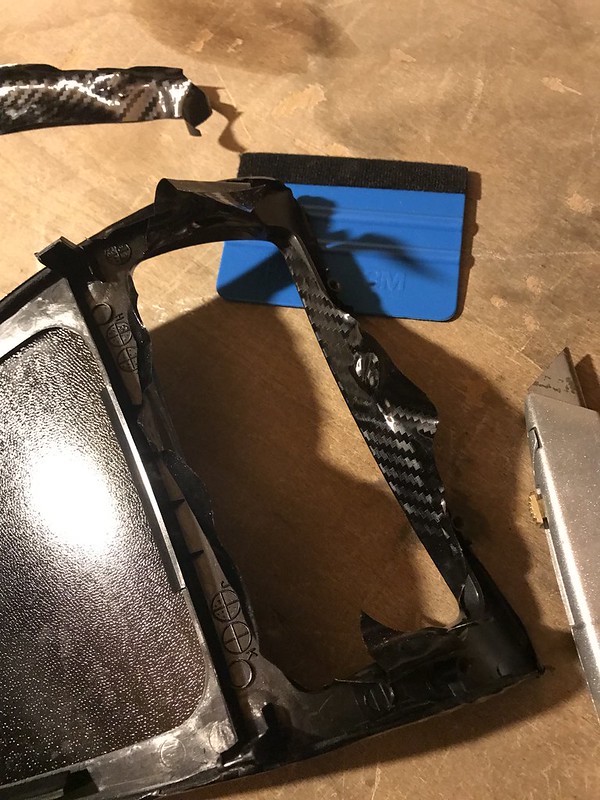 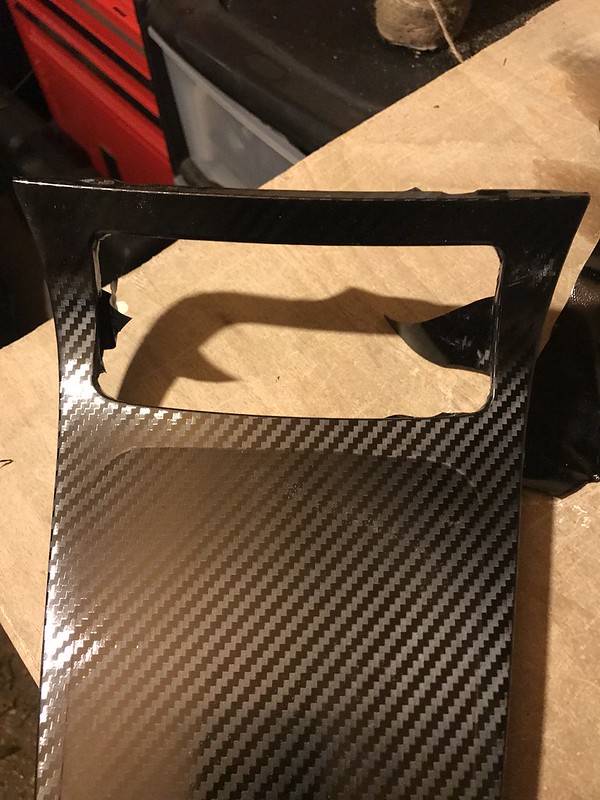 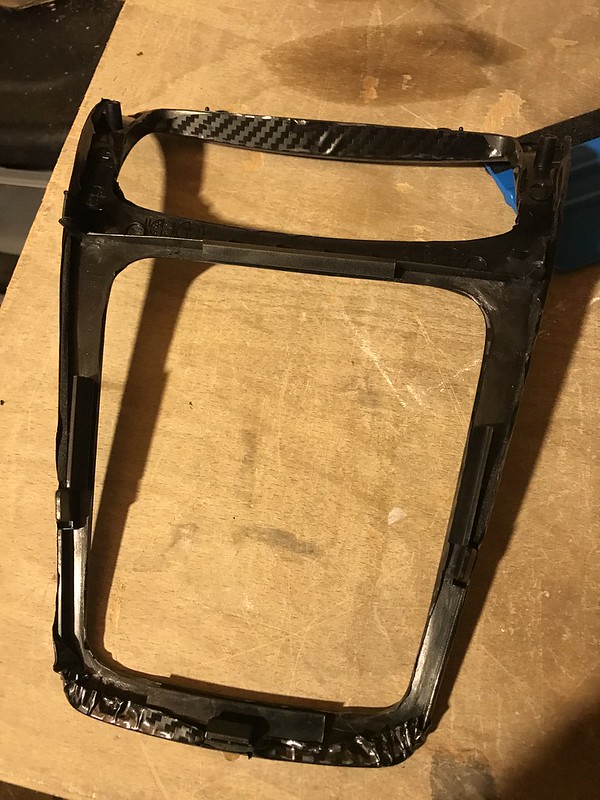 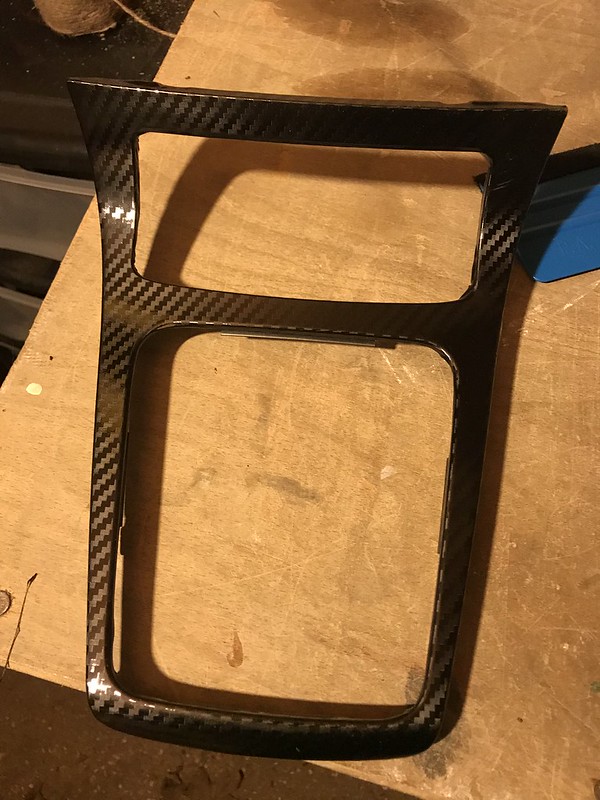 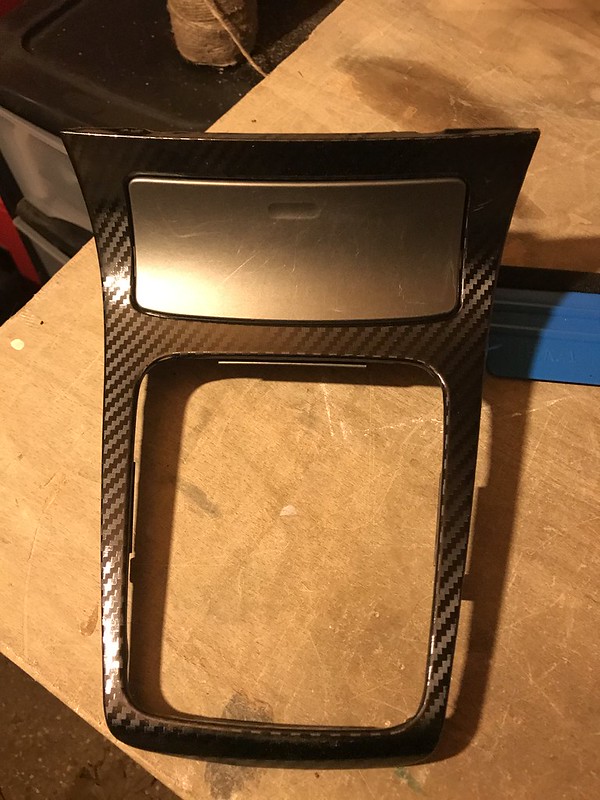 The only thing that is bothering me is one corner I never managed to get the bubbles out no matter how many times I heated and squeegee'd. It's not massively noticeable but I know it's there so it bugs me.  And back in the car...   Mush better now! I'll finish the other ones tomorrow... I didn't fancy trying to wrap the ashtray cover as it has too many moving parts so I may just spray it Gloss Black so it doesn't stand out too much. Thanks for looking!
__________________
2006 WRX Wagon Build Thread Modified and Serviced by Brent @ Southern Motor Developments in Newhaven, East Sussex.
|
|
#80
16-01-2019, 10:49 PM
|
||||
|
||||
|
Very tidy job mate
I like that!
__________________
Subaru Impreza WRX STi Prodrive Type UK 2002: "Tinkered With!" Maintained and Modified by Super Jules & RM Performance http://www.rmperformance.co.uk
|
|
#81
16-01-2019, 10:51 PM
|
||||
|
||||
|
Quote:
I'll do the others tomorrow, too tired now. I just can't believe how much better it looks!
__________________
2006 WRX Wagon Build Thread Modified and Serviced by Brent @ Southern Motor Developments in Newhaven, East Sussex.
|
|
#82
17-01-2019, 06:23 AM
|
||||
|
||||
|
Nice job!
Looks like things are really starting to move along again with the Wagon. The Carbon wrap looks smart but you should try a brave pill and try wrapping the tray lid too, I think it will top it off nicely.
|
|
#83
17-01-2019, 07:51 AM
|
||||
|
||||
|
Quote:
Will look awesome when its all done.
__________________
2006 WRX Wagon Build Thread Modified and Serviced by Brent @ Southern Motor Developments in Newhaven, East Sussex.
|
|
#85
17-01-2019, 09:26 AM
|
||||
|
||||
|
Quote:
__________________
2006 WRX Wagon Build Thread Modified and Serviced by Brent @ Southern Motor Developments in Newhaven, East Sussex.
|
|
#86
17-01-2019, 10:02 AM
|
||||
|
||||
|
Coming along nicely , are they the pro sport gauges?
|
|
#87
17-01-2019, 11:30 AM
|
||||
|
||||
|
Quote:
 looks great and you should try and cover the lid as Rob suggested. looks great and you should try and cover the lid as Rob suggested.
__________________
Type 25 + 96 jdm sti wagon  sti 05 ppp - gone but not forgotten sti 05 ppp - gone but not forgotten 
|
|
#88
17-01-2019, 01:09 PM
|
||||
|
||||
|
Quote:
Quote:
    I really don't like the outcome, there's too many imperfections. Around the opening for the double DIN was terrible to do, it's got so many different 'levels' to it and there wasn't enough vinyl no matter which way I cut the opening. To me it seems too... 'chavvy' now. I'm contemplating removing it all and just settling with Gloss Black spray paint for the whole lot, at least there won't be any imperfections. At least not this noticeable.
__________________
2006 WRX Wagon Build Thread Modified and Serviced by Brent @ Southern Motor Developments in Newhaven, East Sussex.
|
|
#89
17-01-2019, 01:26 PM
|
||||
|
||||
|
I did the same on my Bugeye - Using a Heat gun rather than hair dryer helped but burnt my fingers!
Eventually in summer mine kept coming away at the top of the stereo surround so in the end I went with satin black with a satin lacquer over the top - I know others have used Plastidip which would be my preference but I had the black and lacquer lying about.
__________________
2005 Spec B 6MT - KiDO tuned (~270Bhp)
Custom exhaust - Cosworth filter - Samco Intake - Tints - Bilstein B8/B6 & STI springs - SuperPro ALK - Whiteline positive shift kit, rack mounts, rear adjustable camber bushes, front ARB mounts & strut brace, 20mm rear ARB with AVO mounts, - Hardrace Gearbox and pitch mounts - Prodrive PFF7's - Front Brembos - Kenwood CarPlay - 1/2 carbon grille - STI front splitter
|
|
#90
17-01-2019, 01:54 PM
|
||||
|
||||
|
Not sure how much hydro dipping is these days, seems to be a popular choice on many materials and surfaces on cars.
Its a shame the final outcome wasnt as you had hoped for but you gave it a good go and some of the first parts you did looked the business.
|
|
#91
17-01-2019, 02:40 PM
|
||||
|
||||
|
Quote:
Shame but hey! Ill look into hydrodipping but in the mean time Ill spray it.
__________________
2006 WRX Wagon Build Thread Modified and Serviced by Brent @ Southern Motor Developments in Newhaven, East Sussex.
|
|
#92
17-01-2019, 02:41 PM
|
||||
|
||||
|
Quote:
__________________
2006 WRX Wagon Build Thread Modified and Serviced by Brent @ Southern Motor Developments in Newhaven, East Sussex.
|
|
#93
17-01-2019, 06:42 PM
|
||||
|
||||
|
Quote:
__________________
2005 Spec B 6MT - KiDO tuned (~270Bhp)
Custom exhaust - Cosworth filter - Samco Intake - Tints - Bilstein B8/B6 & STI springs - SuperPro ALK - Whiteline positive shift kit, rack mounts, rear adjustable camber bushes, front ARB mounts & strut brace, 20mm rear ARB with AVO mounts, - Hardrace Gearbox and pitch mounts - Prodrive PFF7's - Front Brembos - Kenwood CarPlay - 1/2 carbon grille - STI front splitter
|
|
#94
17-01-2019, 07:20 PM
|
||||
|
||||
|
Quote:
__________________
2006 WRX Wagon Build Thread Modified and Serviced by Brent @ Southern Motor Developments in Newhaven, East Sussex.
|
|
#95
17-01-2019, 09:36 PM
|
||||
|
||||
|
Just don't let any kids in the car - especially with fresh cooked fairground doughnuts (Yes that is personal experience!).
__________________
2005 Spec B 6MT - KiDO tuned (~270Bhp)
Custom exhaust - Cosworth filter - Samco Intake - Tints - Bilstein B8/B6 & STI springs - SuperPro ALK - Whiteline positive shift kit, rack mounts, rear adjustable camber bushes, front ARB mounts & strut brace, 20mm rear ARB with AVO mounts, - Hardrace Gearbox and pitch mounts - Prodrive PFF7's - Front Brembos - Kenwood CarPlay - 1/2 carbon grille - STI front splitter
|
|
#96
18-01-2019, 08:19 AM
|
||||
|
||||
|
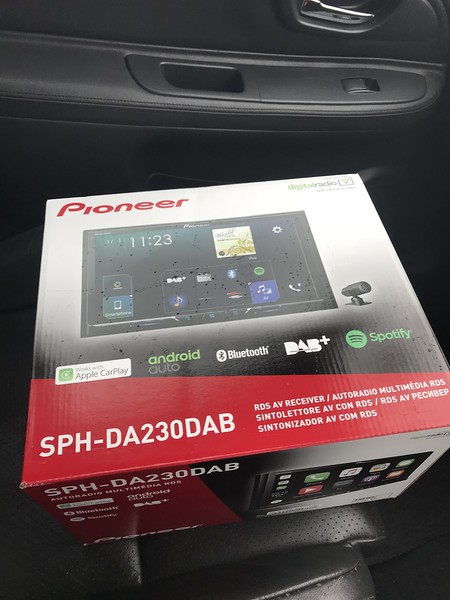
Quote:
__________________
2006 WRX Wagon Build Thread Modified and Serviced by Brent @ Southern Motor Developments in Newhaven, East Sussex.
|
|
#97
18-01-2019, 02:40 PM
|
||||
|
||||
|
So bit of a rubbish update, I gave up painting my fascias as I'm not very good at spraying from a can
The gloss black I used was a rather thick paint, it ran and made a horrible mess of my plastics. I didn't have a proper primer so used some Citadel acrylic based brown that I had laying around. So, I've rubbed them back and they're now with my sprayer... Not sure what it will cost but he will still need to rub them down and he's going to put a high gloss black on them for me. Will be worth the money in the end!  Proper Rally style now! Haha
__________________
2006 WRX Wagon Build Thread Modified and Serviced by Brent @ Southern Motor Developments in Newhaven, East Sussex.
|
|
#98
18-01-2019, 03:47 PM
|
||||
|
||||
|
Best thing to do.
|
|
#99
19-01-2019, 06:37 AM
|
||||
|
||||
|
Good on you for giving it a go.
It's a shame the carbon wrap didn't work out as the early efforts were great. Far better than I'd be able to do, that's for sure! Personally, I think the carbon fibre looks a bit fussy when on small areas and surrounds like that, so for me it'll look better painted anyway.
|
|
#100
19-01-2019, 07:32 AM
|
||||
|
||||
|
Quote:
__________________
2006 WRX Wagon Build Thread Modified and Serviced by Brent @ Southern Motor Developments in Newhaven, East Sussex.
|
 |
| Currently Active Users Viewing This Thread: 2 (0 members and 2 guests) | |
|
|


